Showing posts with label windows 8. Show all posts

Tuesday, 22 November 2011

Forcing a System Crash from the Keyboard

Most of the following keyboards can cause a system crash directly:
PS/2 keyboards connected on i8042prt ports
This feature is available in Windows 2000 and later versions of Windows operating system.
USB keyboards
This feature is available in:
  • Windows Server 2003 Service Pack 1 if the hotfix available with KB 244139 is installed.
  • Windows Server 2003 (with Service Pack 2 or later).
  • Windows Server 2008 Service Pack 1 if the hotfix available with KB 971284 is installed.
  • Windows Server 2008 (with Service Pack 2 or later).
  • Windows 7 and later versions of Windows operating system.
You must ensure the following three settings before the keyboard can cause a system crash:
  1. If you wish a crash dump file to be written, you must enable such dump files, choose the path and file name, and select the size of the dump file. For more information, see Enabling a Kernel-Mode Dump File.
  2. With PS/2 keyboards, you must enable the keyboard-initiated crash in the registry. In the registry key HKEY_LOCAL_MACHINE\System\CurrentControlSet\Services\i8042prt\Parameters, create a value named CrashOnCtrlScroll, and set it equal to a REG_DWORD value of 0x01.
  3. With USB keyboards, you must enable the keyboard-initiated crash in the registry. In the registry key HKEY_LOCAL_MACHINE\System\CurrentControlSet\Services\kbdhid\Parameters, create a value named CrashOnCtrlScroll, and set it equal to a REG_DWORD value of 0x01.
You must restart the system for these settings to take effect.
After this is completed, the keyboard crash can be initiated by using the following hotkey sequence: Hold down the rightmost CTRL key, and press the SCROLL LOCK key twice.
The system then calls KeBugCheck and issues bug check 0xE2 (MANUALLY_INITIATED_CRASH). Unless crash dumps have been disabled, a crash dump file is written at this point.
If a kernel debugger is attached to the crashed machine, the machine will break into the kernel debugger after the crash dump file has been written.
For more information on using this feature, refer to the article Generate a memory dump file by using the keyboard (KB 244139).

Defining Alternate Keyboard Shortcuts to Force a System Crash from the Keyboard

You can configure values under the following registry subkeys for different keyboard shortcut sequences to generate the memory dump file:
  • For PS/2 keyboards:
    HKEY_LOCAL_MACHINE\SYSTEM\CurrentControlSet\Services\i8042prt\crashdump
  • For USB keyboards:
    HKEY_LOCAL_MACHINE\SYSTEM\CurrentControlSet\Services\kbdhid\crashdump
You must create the following registry REG_DWORD values under these subkeys:
Dump1Keys
The Dump1Keys registry value is a bit map of the first hot key to use. For example, instead of using the rightmost CTRL key to initiate the hot key sequence, you can set the first hot key to be the leftmost SHIFT key. The values for the first hot key are described in the following table.
ValueFirst key used in the keyboard shortcut sequence
0x01
Rightmost SHIFT key
0x02
Rightmost CTRL key
0x04
Rightmost ALT key
0x10
Leftmost SHIFT key
0x20
Leftmost CTRL key
0x40
Leftmost ALT key
Note  You can assign Dump1Keys a value that enables one or more keys as the first key used in the keyboard shortcut sequence. For example, assign Dump1Keys a value of 0x11 to define both the rightmost and leftmost SHIFT keys as the first key in the keyboard shortcut sequence.
Dump2Key
The Dump2Key registry value is the index into the scancode table for the keyboard layout of the target computer. The following is the actual table in the driver.
const UCHAR keyToScanTbl[134] = { 
        0x00,0x29,0x02,0x03,0x04,0x05,0x06,0x07,0x08,0x09,
        0x0A,0x0B,0x0C,0x0D,0x7D,0x0E,0x0F,0x10,0x11,0x12,
        0x13,0x14,0x15,0x16,0x17,0x18,0x19,0x1A,0x1B,0x00,
        0x3A,0x1E,0x1F,0x20,0x21,0x22,0x23,0x24,0x25,0x26,
        0x27,0x28,0x2B,0x1C,0x2A,0x00,0x2C,0x2D,0x2E,0x2F,
        0x30,0x31,0x32,0x33,0x34,0x35,0x73,0x36,0x1D,0x00,
        0x38,0x39,0xB8,0x00,0x9D,0x00,0x00,0x00,0x00,0x00,
        0x00,0x00,0x00,0x00,0x00,0xD2,0xD3,0x00,0x00,0xCB,
        0xC7,0xCF,0x00,0xC8,0xD0,0xC9,0xD1,0x00,0x00,0xCD,
        0x45,0x47,0x4B,0x4F,0x00,0xB5,0x48,0x4C,0x50,0x52,
        0x37,0x49,0x4D,0x51,0x53,0x4A,0x4E,0x00,0x9C,0x00,
        0x01,0x00,0x3B,0x3C,0x3D,0x3E,0x3F,0x40,0x41,0x42,
        0x43,0x44,0x57,0x58,0x00,0x46,0x00,0x00,0x00,0x00,
        0x00,0x7B,0x79,0x70 };
Note   Index 124 (sysreq) is a special case because an 84-key keyboard has a different scan code.
If you define alternate keyboard shortcuts to force a system crash from a USB or PS/2 keyboard, you must either set the CrashOnCtrlScroll registry value to 0 or remove it from the registry.

Limitations

It is possible for a system to freeze in such a way that the keyboard shortcut sequence will not work. However, this should be a very rare occurrence. Using the keyboard shortcut sequence to initiate a crash will work even in many instances where CTRL+ALT+DELETE does not work.
Forcing a system crash from the keyboard does not work if the computer stops responding at a high interrupt request level (IRQL). This limitation exists because the Kbdhid.sys driver, which allows the memory dump process to run, operates at a lower IRQL than the i8042prt.sys driver.

Tuesday, 18 October 2011

How to Install or Enable Hyper-V Virtualization in Windows 8


sshot-13
Windows 8 includes Hyper-V as a virtualization platform, but since not everybody will use this feature, it’s not enabled by default. Here’s how to enable it on your Windows 8 PC.

Confusion

Hyper-V only allows you to create a new virtual machine on 64-bit versions of Windows 8, but the client tools are available on both versions. If you are running 32-bit, you’ll be able to do the installation, but you won’t be able to actually use it to create a new VM.

Installing or Enabling Hyper-V

Hyper-V is installed in the add features section of the add or remove programs dialog. To get there we need to open a run box by pressing Win+R, now type appwiz.cpl and press enter. You could also get to the Programs and Features box through Control Panel or the Start search, but this is easy and geeky.
sshot-2
Once the Programs and Features dialog opens, select the Turn Windows features on or off link on the left hand side.
sshot-3
When the Windows Features open, check the Hyper-V option. Then click Ok.
sshot-8
Windows will now add the Hyper-V binaries to your Windows installation.
sshot-7
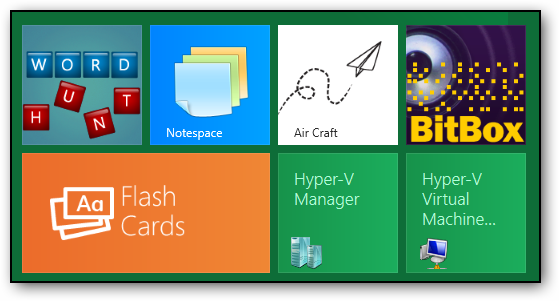
You can now launch the Hyper-V manager from the Metro dashboard.
sshot-6
sshot-10

Thursday, 29 September 2011

How To Uninstall Windows 8 Developer Preview completely

Microsoft Windows 8 Developer Preview promises to be one of the finest operating systems by Microsoft. Most of the users who are using Window 8 Developer Preview have given positive reviews for this operating system.

It has been reported that Windows 8 Developer Preview was downloaded 500,000 times in less than a day after its release. And by now, we can be sure that it has crossed the one million mark.

Windows 8 Developer Preview has introduced many new features and concepts and is compatible with all the systems which are compatible with the Windows 7. For this reason, most of the users dual boot Windows 8 Developer Preview with Windows 7.

If for some reason, you want to do uninstall Windows 8, you can follow any of the 2 methods discussed below:

Uninstall Windows 8 using the Boot Option in msconfig.


1. Type msconfig in start search and hit Enter.

uninstall 01 How To Uninstall Windows 8 Developer Preview completely2. System Configuration box will open up. Navigate to the Boot Tab and select Windows Developer Preview. Next click on Delete.

3. Click on Apply button and then finally click on OK.

4. Now, you just have to format the partition where you had installed Windows 8 Developer Preview and then you can get your disk space back. To do so, Open Computer folder and right-click the drive on which it has been installed. Select Format.


That’s it! You are all done!

format menu 217x400 How To Uninstall Windows 8 Developer Preview completelyUninstall Windows 8 using EasyBCD


EBCD How To Uninstall Windows 8 Developer Preview completely
1. EasyBCD is a free utility which can be used to uninstall Windows 8 Developer Preview. For this, you first need to download and install EasyBCD application on Windows 7.

2. After installing EasyBCD, run it. Click on Yes if prompted by User Access Control

uninstall windows 8 0 How To Uninstall Windows 8 Developer Preview completely3. Now, click on the Edit Boot Menu button. You will see the entry named Windows Developer Preview. Select it and click on the Delete button.

4. A confirmation prompt will pop up. Click on Yes.uninstall windows 8 How To Uninstall Windows 8 Developer Preview completely

5. Now, you have just removed the Windows 8 Developer Preview entry from your boot menu. Click on Save settings and close the application.

6. The last step is to format the partition where you had installed Windows 8 Developer Preview to get your disk space back.

Following these steps, you will have successfully uninstalled Windows 8 Developer Preview from your computer completely.

Thursday, 22 September 2011

How to Use the New File History Feature in Windows 8

Jealous of your Mac OS X friends and their great Time Machine feature? Windows 8 has a new feature called File History that works much the same way, giving you an easy method to restore previous versions of your files.
If you’re a Windows 7 or Vista user, you’ve probably already read about how to use Previous Versions, and this is similar, but works a lot better. By default File History in Windows 8 takes snapshots of all files in your Libraries, Desktop, Contacts, and Favorites every hour (although this can be changed to more frequently or less frequently) and keeps the snapshots forever (this can also be changed).

Setting Up File History

To get started with File History it first needs to be enabled. To enable it, launch the control panel from the new Windows 8 start screen.
sshot-1
When the new Metro style control panel opens, scroll all the way to the bottom and select the More settings option.
sshot-2
This will launch the classic control panel we are all used to in “category“ view. To get to the File History settings, select the System and Security link.
sshot-3
If you look near the bottom of the list you will see an option that says File History, click on the link. This will bring up the settings for the File History feature.
sshot-6
You now will either need to plug in a USB Drive (this can be either a thumb drive or an external hard drive), or you can specify a network location. If you plug in a USB Drive the “turn on” button will immediately become available. However to cover all the methods we are going to opt to choose a network location. To do this, click on the “Change drive” link on the left hand side to bring up the dialog where you can select the “Add network location” button. When the window opens, you can select the PC on which you wish to save your File History.
sshot-7
Once you’re done and you have clicked on the OK button, you will be taken back to the File History settings screen. Simply click the “turn on” button to activate File History.
sshot-8
When you click on the “turn on” button a message will pop up asking you if you wish to recommend the location that you used for File History to other users in your HomeGroup as a place to save their File History. If you have a HomeGroup and want to have a central location where all users in the HomeGroup can store their File History you will probably want to say yes, otherwise it’s OK to choose no.
sshot-9
Once you have selected the option which pertains to your setup, File History will now be set up and working. The one thing you may want to configure is the option that allows you to take snapshots more regularly than every hour and you might also want to configure how long copies are kept for. To do this hit the “Advanced settings” link on the left hand side.
sshot-10
Once you have configured the settings to match your needs you are ready to go.

Restoring A Deleted File Or Folder

In this example I have 1 file in the Documents Library called “My Plans To Take Over The World”, and I am going to accidently delete the document and restore it using File History.
sshot-12
I’ve now deleted the file permanently by doing a Shift-Delete as I don’t think I will be taking over the world anymore. I have also created two new files called “New File 1” and “New File 2”, making the library look like this:
sshot-10
A few minutes later, my partner in crime phones me and tells me that he is free this week, and it looks like a good week to conquer the world. The problem is that I just deleted my plan. Luckily I had set up File History a while back and can recover the document.  So basically what we need to do is restore the file that we deleted but we don’t want to effect any files that we may have edited since then, such as “New File 1” and “New File 2” . To do that we to that we select the File History button on the ribbon.
sshot-1
This will launch the File History browser, and give you all the different versions of the Documents Library.
sshot-14
If I scroll back to Version 8 of 10 using the arrow that’s pointing back (left), you will see that my document called “My Plans To Take Over The World” is there. I can then select it to choose it for restore.
sshot-1
Once we have selected the file that we want to restore, we can click on the Blue Orb (Center Button) to restore the document. File History will launch the folder that you are busy working with and show you that the file is now there.
sshot-15

To Restore A Previous Version Of A File

In this example I only have 1 file in my Documents Library called “My Plans To Take Over The World”. The document looks like this.
sshot-1
I now make changes to the document and save it. So it now looks like this.
sshot-1
A few hours later I realize that I like the the original plan better, so to get the older version back I can click on that specific document and click the File History button.
sshot-1
This will allow us to scroll through Versions of the document while viewing its contents.
sshot-1
If we scroll one version back.  We can see that we can see the old version of the document.
sshot-1
When you click on the Restore Orb, you will be asked what you want to do.
sshot-1
That’s all there is to it.

Tuesday, 20 September 2011

How to Dual-Boot Windows 7 and Windows 8 On the Same PC


If you want to try out the new Windows 8 but don’t have a CPU that supports virtualization, check out our guide on how to get all the goodness of Windows 8 along side Windows 7 by dual booting.
The scenario: you are in a situation where you have Windows 7 installed and you really want to try out Windows 8, but your PC does not support virtualization and you don’t want to have to format since Windows 8 is still in pre-beta and the chances are that there are some things that are broken. The only option you have here is to dual boot. The only thing that is required in order to dual boot is a hard drive with at least 20 Gigs of free space, it will work with a bit less but this is the minimum we recommend.

Dual Booting Windows 7 and Windows 8

To get started we need to logically separate those 20 Gigs from the space that Windows 7 is currently using, to do this we need to create a new partition. You can do this in the disk management MMC snap-in, to launch the snap-in press the Windows Key + R to launch a run box, type “diskmgmt.msc” into the run box.
sshot-1
Once you press enter or click the ok button, a MMC will load with the disk management snap-in pre-loaded. From here you can get a nice overview of your hard drives.
sshot-1
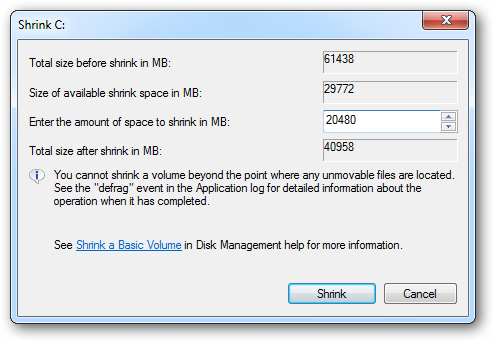
You are now going to need to shrink the C: drive by the capacity that you wish your Windows 8 drive should be. To shrink the drive right click on the C: drive and select “shrink volume”
sshot-2
A dialog box will appear asking you how much you want to shrink the drive by. It asks you how much you would like to shrink in megabytes, so remember that there is 1024 megabytes in a gig so in our example we shrink 20 gigs which is20480 megabytes because 20*1024=20480.
sshot-3
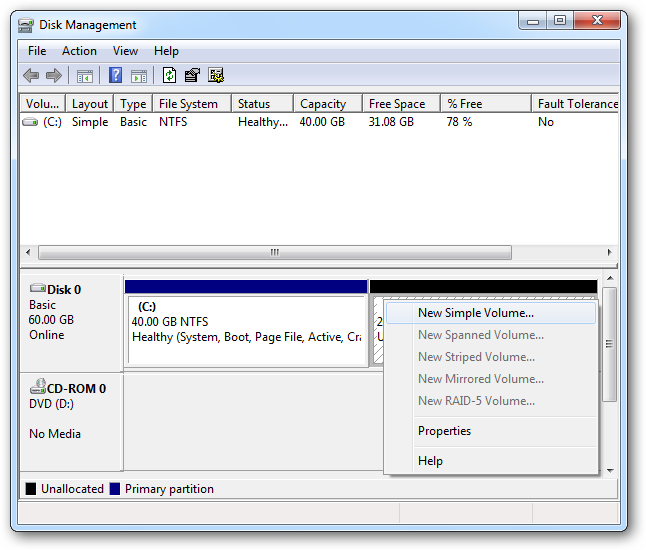
Once you click the shrink button Windows will shrink your drive. Once it has completed shrinking your partition, the Disk Manager will display this new space with a black header meaning it is an empty partition, you now need to give it a file system. To format the drive with a file system right click on the black space and select “New Simple Volume”.
sshot-4
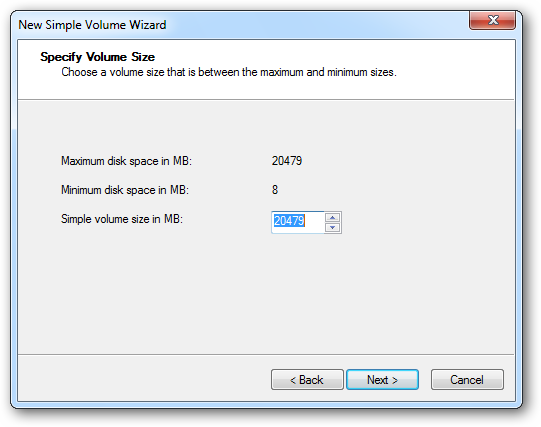
A wizard will launch this is going to take us through all the steps we need to format the drive. On the welcome screen you can just select next to be asked how much of the unallocated space you want to use, we recommend you leave the default which will use all the space you set aside if you alter this it may result in some space going to waste.
sshot-5
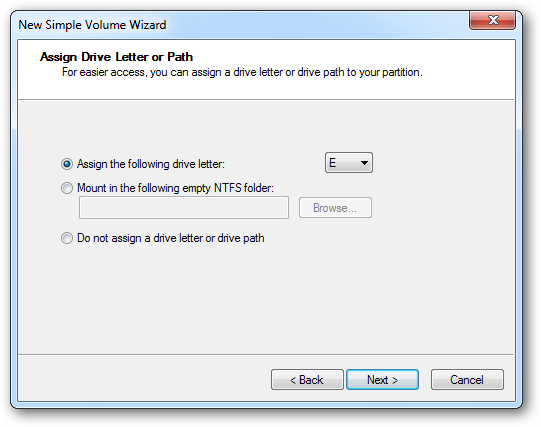
In the next dialog it asks you to assign it a drive letter, you can accept the defaults and click next.
sshot-6
On the format partition step of the wizard you can leave everything at defaults accept for the Volume Label which you should change to something memorable for example “Windows 8” this is important as this is the partition you will have to select at install time.
sshot-7
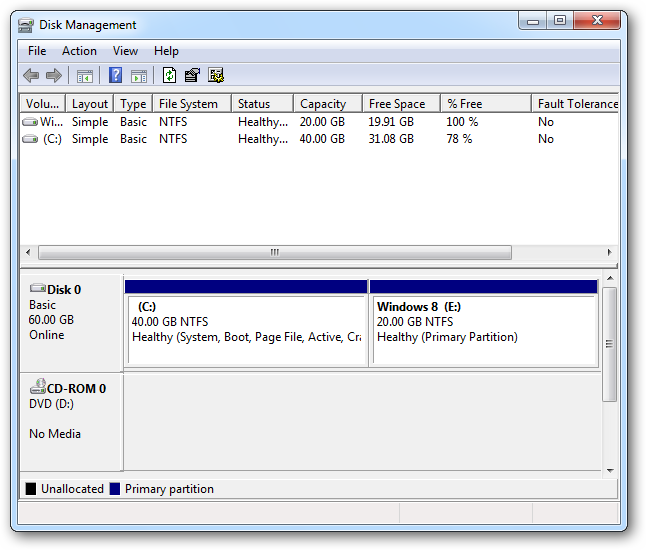
Click next and finish to initiate the format.  Once the format is finished the once black header will now be blue and you are ready to install Windows 8.
sshot-8

Installation

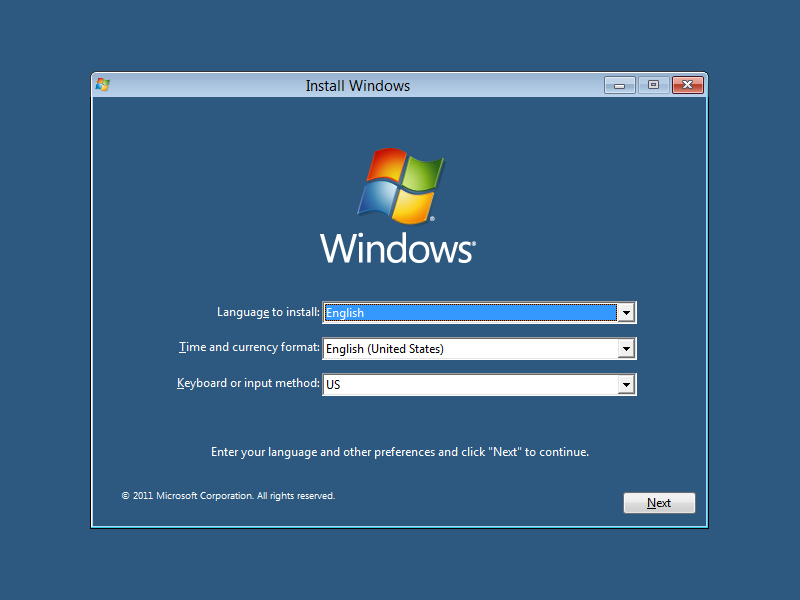
If you haven’t yet downloaded a copy of the Windows 8 Developers Preview you should head over here and grab yourself a copy. Once you have either burned the ISO to a DVD or used the USB Download Tool to make a bootable USB you are ready to go, simply insert you DVD or plug in your USB and boot from the device. You might have to into the BIOS and change the boot order but since you dual booting pre-beta software we’ll assume you capable of that much. If you see the words “press any key to boot from CD or DVD” quickly press any key on your keyboard to begin configuring the installation.
Dual Boot Demo-2011-09-15-21-11-19
Once you have selected your languages the your are ready to install Windows 8. So click the install button to get started.
Dual Boot Demo-2011-09-15-21-21-17
Dual Boot Demo-2011-09-15-21-23-55
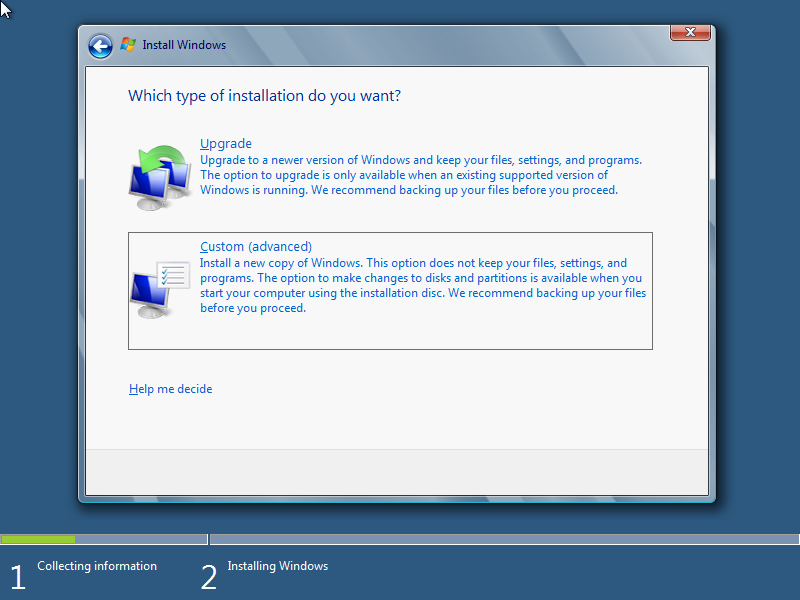
After setup has completed you will be asked to accept the license agreement, after you have read it, fill the check box and click next to move on to the installation type. You should choose the custom installation option.
Dual Boot Demo-2011-09-15-21-36-49
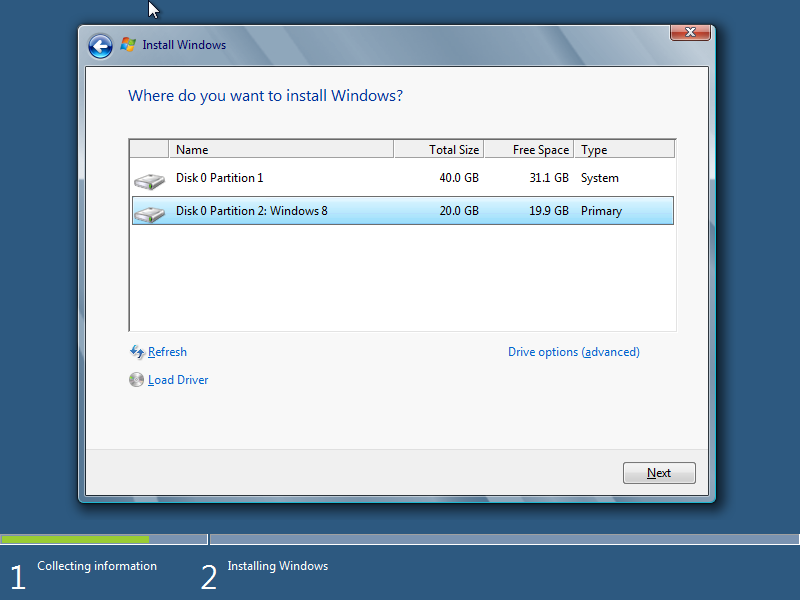
The next decision you will have to make is a critical one. Choosing the wrong partition to install on will result in data loss so make sure to choose the one that we created earlier.

Dual Boot Demo-2011-09-15-21-50-57
Once you have selected the partition and clicked next. The installation will start.
Dual Boot Demo-2011-09-15-21-53-31
Once the installation in complete you will be asked to give your PC a name, then click on the next button.
Dual Boot Demo-2011-09-15-22-04-15
The settings page that you will see next has two options, Use express settings and Customize, we’ll choose use express settings but feel free to choose custom option and specify your own settings.
Dual Boot Demo-2011-09-15-22-07-31
The next decision you will have to make is whether you want to log into your computer using a Windows Live ID, or create a local account. We want a local account so we’ll click the link that says Don’t want to log in with a Windows Live ID.
Dual Boot Demo-2011-09-15-22-12-04
Then we’ll choose local account on the next page.
Dual Boot Demo-2011-09-15-22-31-21
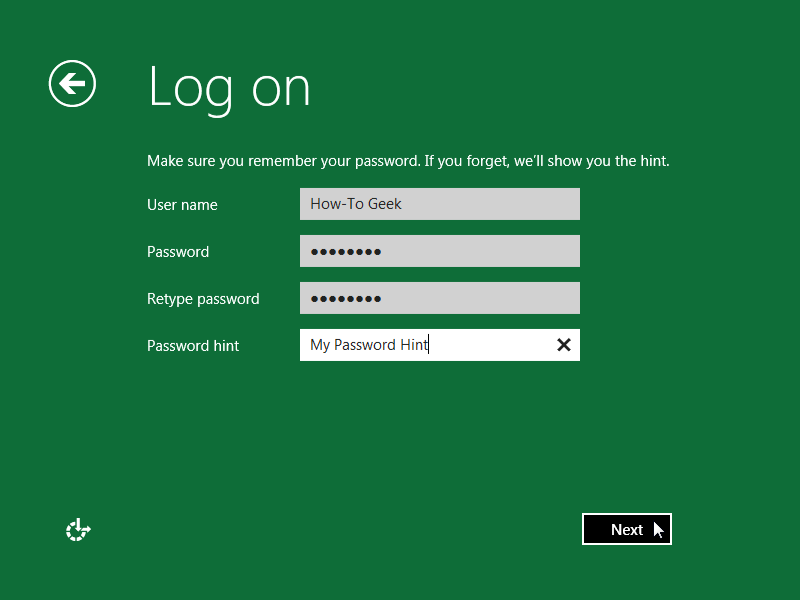
Type the name that you want to use as a log on name, also choose a strong password and a hint just incase your forget your password. When you done click next, your account will be created and you will be logged in.
Dual Boot Demo-2011-09-15-22-34-26
Once it has logged you in you can restart your PC to see the new OS Selection screen. By default it will boot into Windows 8 after 30 seconds of inactivity, you probably don’t want this. To change the default back to Windows 7 click the Change defaults or choose other options link at the bottom of the screen.
Dual Boot Demo-2011-09-15-22-37-59
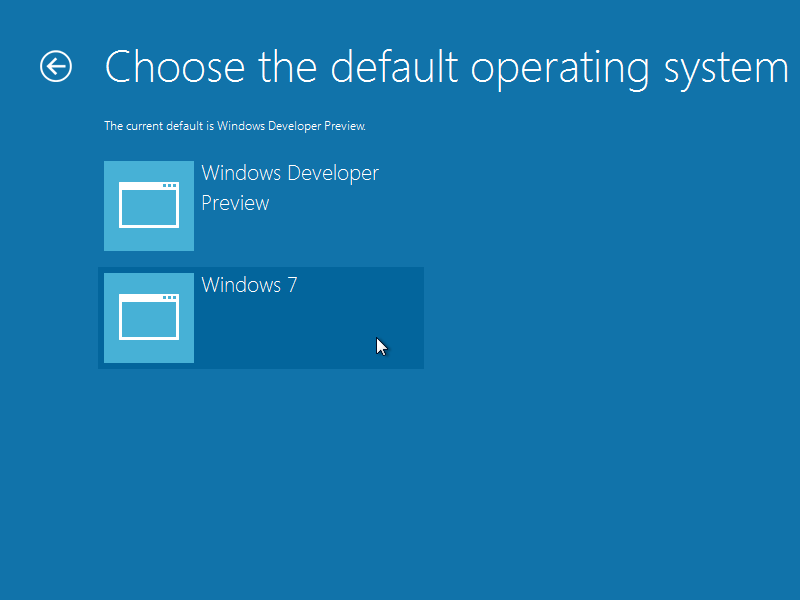
Now choose the change default operating system link.
Dual Boot Demo-2011-09-15-22-50-24
And finally select Windows 7.
Dual Boot Demo-2011-09-15-22-50-56
That’s all you have to do to reap the benefits of both worlds. To get started with Windows 8, you should probably check out our guide to all the new awesomeness it brings.
Browser Name:
Browser Version:
Browser Code Name:
User-Agent: