Showing posts with label Windows 7. Show all posts

Friday, 25 November 2011

Quick Tip: Select files in Windows Explorer with check boxes

Takeaway: With one little tweak, you can change the behavior of Microsoft Windows Explorer to allow multiple file selection with check boxes.
In previous  we have presented several Windows Explorer tweaks that make the tool more efficient and, in some cases, just plain less frustrating. But there is one tweak we have yet to mention — the ability to select multiple files with check boxes.
While you can select multiple files in Windows Explorer by holding down the CTRL key for each mouse click, that is a two-handed procedure. However, with the check box feature turned on, you can select multiple files with one mouse-equipped hand. To turn on this feature, you will have to change a setting in the Folder and Search Options of Windows Explorer.


Change options

Open a session of Windows Explorer in a folder with numerous files, like the one shown in Figure A.

Figure A

Open Windows Explorer.
Click the Organize tab on the top menu and navigate to the Folder and Search Options menu item, as shown in Figure B.

Figure B

Navigate to the Folder and Search Options menu item.
When you get to the Folder Options screen, click on the View tab (Figure C). Notice some the changes we made to Windows Explorer before, such as showing hidden files and system files — two of my favorites.

Figure C

Click the View tab.
Scroll down the list of options and find the Use Check Boxes to Select Items entry in the list (Figure D) and check the box to activate the feature. Click OK to put it into effect.

Figure D

Check the Use Check Boxes to Select Items entry.
Now when you go back to the Windows Explorer window, you will see check boxes next to each file in the folder (Figure E). You will also see a check box that will check all the files in the folder.

Figure E

Now we have check boxes.
Stay on top of the latest Microsoft Windows tips and tricks with TechRepublic’s Windows Desktop newsletter, delivered every Monday and Thursday. Automatically sign up today!

Tuesday, 22 November 2011

How to clear the Diskspace in server

Hope u can have more free space by doing the below things.. u can have some GBs of space free..
1) delete or move the file from

C:\Documents and Settings\All Users\Application Data\Symantec\Cached Installs
2) Delete contents from C:\recycler ( To see this, u need to uncheck the hide protected OS files from tools-folder options - view)
3) Delete c:\temp and c:\windows\temp
4) MOve friles C:\WINDOWS\$hf_mig$ to D:\ drive or any available drive or delete the old files.
5) Move C:\WINDOWS\$NtUninstallKB*****$ to D:\ drive
6) Delete files C:\WINDOWS\PCHealth\ERRORREP\UserDumps and delete old logs in C:\WINDOWS\PCHealth\ERRORREP\QSIGNOFF
7) Move C:\WINDOWS\Installer files from D:\ drive
8) MOve C:\WINDOWS\system32\dllcache to D:\drive
9) Compress the old log files if any 


I have not tried  for Windows 7... but it will works for it I Guess...

Forcing a System Crash from the Keyboard

Most of the following keyboards can cause a system crash directly:
PS/2 keyboards connected on i8042prt ports
This feature is available in Windows 2000 and later versions of Windows operating system.
USB keyboards
This feature is available in:
  • Windows Server 2003 Service Pack 1 if the hotfix available with KB 244139 is installed.
  • Windows Server 2003 (with Service Pack 2 or later).
  • Windows Server 2008 Service Pack 1 if the hotfix available with KB 971284 is installed.
  • Windows Server 2008 (with Service Pack 2 or later).
  • Windows 7 and later versions of Windows operating system.
You must ensure the following three settings before the keyboard can cause a system crash:
  1. If you wish a crash dump file to be written, you must enable such dump files, choose the path and file name, and select the size of the dump file. For more information, see Enabling a Kernel-Mode Dump File.
  2. With PS/2 keyboards, you must enable the keyboard-initiated crash in the registry. In the registry key HKEY_LOCAL_MACHINE\System\CurrentControlSet\Services\i8042prt\Parameters, create a value named CrashOnCtrlScroll, and set it equal to a REG_DWORD value of 0x01.
  3. With USB keyboards, you must enable the keyboard-initiated crash in the registry. In the registry key HKEY_LOCAL_MACHINE\System\CurrentControlSet\Services\kbdhid\Parameters, create a value named CrashOnCtrlScroll, and set it equal to a REG_DWORD value of 0x01.
You must restart the system for these settings to take effect.
After this is completed, the keyboard crash can be initiated by using the following hotkey sequence: Hold down the rightmost CTRL key, and press the SCROLL LOCK key twice.
The system then calls KeBugCheck and issues bug check 0xE2 (MANUALLY_INITIATED_CRASH). Unless crash dumps have been disabled, a crash dump file is written at this point.
If a kernel debugger is attached to the crashed machine, the machine will break into the kernel debugger after the crash dump file has been written.
For more information on using this feature, refer to the article Generate a memory dump file by using the keyboard (KB 244139).

Defining Alternate Keyboard Shortcuts to Force a System Crash from the Keyboard

You can configure values under the following registry subkeys for different keyboard shortcut sequences to generate the memory dump file:
  • For PS/2 keyboards:
    HKEY_LOCAL_MACHINE\SYSTEM\CurrentControlSet\Services\i8042prt\crashdump
  • For USB keyboards:
    HKEY_LOCAL_MACHINE\SYSTEM\CurrentControlSet\Services\kbdhid\crashdump
You must create the following registry REG_DWORD values under these subkeys:
Dump1Keys
The Dump1Keys registry value is a bit map of the first hot key to use. For example, instead of using the rightmost CTRL key to initiate the hot key sequence, you can set the first hot key to be the leftmost SHIFT key. The values for the first hot key are described in the following table.
ValueFirst key used in the keyboard shortcut sequence
0x01
Rightmost SHIFT key
0x02
Rightmost CTRL key
0x04
Rightmost ALT key
0x10
Leftmost SHIFT key
0x20
Leftmost CTRL key
0x40
Leftmost ALT key
Note  You can assign Dump1Keys a value that enables one or more keys as the first key used in the keyboard shortcut sequence. For example, assign Dump1Keys a value of 0x11 to define both the rightmost and leftmost SHIFT keys as the first key in the keyboard shortcut sequence.
Dump2Key
The Dump2Key registry value is the index into the scancode table for the keyboard layout of the target computer. The following is the actual table in the driver.
const UCHAR keyToScanTbl[134] = { 
        0x00,0x29,0x02,0x03,0x04,0x05,0x06,0x07,0x08,0x09,
        0x0A,0x0B,0x0C,0x0D,0x7D,0x0E,0x0F,0x10,0x11,0x12,
        0x13,0x14,0x15,0x16,0x17,0x18,0x19,0x1A,0x1B,0x00,
        0x3A,0x1E,0x1F,0x20,0x21,0x22,0x23,0x24,0x25,0x26,
        0x27,0x28,0x2B,0x1C,0x2A,0x00,0x2C,0x2D,0x2E,0x2F,
        0x30,0x31,0x32,0x33,0x34,0x35,0x73,0x36,0x1D,0x00,
        0x38,0x39,0xB8,0x00,0x9D,0x00,0x00,0x00,0x00,0x00,
        0x00,0x00,0x00,0x00,0x00,0xD2,0xD3,0x00,0x00,0xCB,
        0xC7,0xCF,0x00,0xC8,0xD0,0xC9,0xD1,0x00,0x00,0xCD,
        0x45,0x47,0x4B,0x4F,0x00,0xB5,0x48,0x4C,0x50,0x52,
        0x37,0x49,0x4D,0x51,0x53,0x4A,0x4E,0x00,0x9C,0x00,
        0x01,0x00,0x3B,0x3C,0x3D,0x3E,0x3F,0x40,0x41,0x42,
        0x43,0x44,0x57,0x58,0x00,0x46,0x00,0x00,0x00,0x00,
        0x00,0x7B,0x79,0x70 };
Note   Index 124 (sysreq) is a special case because an 84-key keyboard has a different scan code.
If you define alternate keyboard shortcuts to force a system crash from a USB or PS/2 keyboard, you must either set the CrashOnCtrlScroll registry value to 0 or remove it from the registry.

Limitations

It is possible for a system to freeze in such a way that the keyboard shortcut sequence will not work. However, this should be a very rare occurrence. Using the keyboard shortcut sequence to initiate a crash will work even in many instances where CTRL+ALT+DELETE does not work.
Forcing a system crash from the keyboard does not work if the computer stops responding at a high interrupt request level (IRQL). This limitation exists because the Kbdhid.sys driver, which allows the memory dump process to run, operates at a lower IRQL than the i8042prt.sys driver.

Tuesday, 18 October 2011

Download 9 Free e-Books from Microsoft on Win7, WP7, VS2010, and More

Free ebook


Enlarge picture
Microsoft Press is offering no less than nine free ebooks 
for download on a variety of topics, from the latest 
iterations of the Windows client and the Office 
productivity suite to the first Windows Phone 
OS and to the company’s developer platform.


At the bottom of this article users will be able to 
find the complete list with all the free resources offered by the Redmond along with the 
links necessary to download all the goodies.


Of course, those familiar with Microsoft Press know that this is not the first time that 
the software giant has shared ebooks with the public, free of charge.


The latest resources are packaged in no less than nine books designed to 
help customers make the best out of a range of Microsoft products and technologies.


The most recent free ebook offered by the company is set up to streamline 
the programming of applications designed for Windows Phone 7.


There are two Widnows 7 ebooks, and one focused on Windows Server 2008 R2. 
Products such as Visual Studio 2010, Office 2010, SQL Server 2008 R2 but also 
virtualization solutions are also covered.


Here is the list of free ebooks courtesy of Microsoft Press:


Free ebook: Programming Windows Phone 7, by Charles Petzold 
(a 24-chapter gift from the Windows Phone 7 team and Microsoft Press)


Free ebook: Moving to Microsoft Visual Studio 2010 
(10 chapters by Patrice Pelland, Pascal Paré, and Ken Haines)
 Free ebook: Introducing Microsoft SQL Server 2008 R2 
(10 chapters by Ross Mistry and Stacia Misner)


Free ebook: Own Your Future: Update Your Skills with Resources and Career 
Ideas from Microsoft 
(8 chapters by Katherine Murray)


Free ebook: Understanding Microsoft Virtualization Solutions (Second Edition) 
(6 chapters by Mitch Tulloch)


Free ebook: First Look Microsoft Office 2010 
(14 chapters by Katherine Murray)


Free ebook: Windows 7 troubleshooting tips 
(short ebook by Mitch Tulloch)


Free ebook: Introducing Windows Server 2008 R2 
(9 chapters by Charlie Russel and Craig Zacker)


Free ebook: Deploying Windows 7, Essential Guidance 
(10 chapters from the Windows 7 Resource Kit and 6 TechNet articles)

Monday, 17 October 2011

How can I determine if my computer/operating system is 64-bit?


Windows If you are using Windows 7, click Start -> Control Panel -> System and Security -> System. The System type: line will give you the Operating System type:
Windows Vista users should click Start -> Control Panel -> System and Maintenance -> System. The System type: line will give you the Operating System type:
If you are using Windows XP, click Start -> Run and type dxdiag. If a Windows dialog box is displayed asking if you want to verify your drivers, you can safely click No and continue. When the program has finished loading, you should see something similar to one of the following images:
   
The Operating System line, refers to Windows x64 or 64-bit edition. The last image above specifies the processor Itanium, which is a 64-bit processor.

Mac

Select About this Mac from the Apple menu. The text below Mac OS X will give the operating system version, and the Processor line will give you the processor type.
about this mac
Mac OS X 10.5 (or greater) is a 64-bit operating system. Intel Core 2 Duo, Intel Xeon, and PowerPC G5 are 64-bit processors. However, 64-bit Stata for Mac is available only for 64-bit Intel-based Macs.
All currently shipping Macs have a 64-bit processor and a 64-bit operating system.

Unix (IBM-AIX, Sun Solaris)

  • IBM-AIX

    The getconf command will return the configuration of your machine. Since you are looking only for the kernel parameters, you should type

    [cph@anna ~]$ getconf -a | grep KERN
    KERNEL_BITMODE: 64

    If that fails or does not return a result, try the file command.

    [cph@anna ~]$ file /usr/lib/boot/unix*
    /usr/lib/boot/unix: 64-bit XCOFF executable or object module not stripped
    /usr/lib/boot/unix_64: 64-bit XCOFF executable or object module not stripped
    /usr/lib/boot/unix_mp: executable (RISC System/6000) or object module not stripped
    /usr/lib/boot/unix_up: executable (RISC System/6000) or object module not stripped

    [cph@ozona ~]$ file /usr/lib/boot/unix*
    /usr/lib/boot/unix: symbolic link to /usr/lib/boot/unix_up.
    /usr/lib/boot/unix_kdb: executable (RISC System/6000) or object module not stripped
    /usr/lib/boot/unix_up: executable (RISC System/6000) or object module not stripped

    We can see that 'anna' is a 64-bit capable platform, and 'ozona' is only 32-bit.
  • Sun Solaris

    Sun's platforms transitioned to 64-bit over a period of time, making identifying the platform for 64-bit compliance tricky. Sun has stated:

    Sun has implemented its 64-bit operating system in phases. The Solaris 2.5 Operating Environment provided support for increased precision with 64-bit math and also included support for 64-bit asynchronous I/O. The Solaris 2.6 Operating Environment added support for large datasets with large (1 Terabyte) filesystems while allowing co-existence of 32-bit and 64-bit files. Beginning with the Solaris 7 Operating Environment, Sun introduced support for large virtual address spaces with a full 64-bit operating system. Sun began shipping 64-bit hardware in 1995. By phasing in operating system support for 64-bits Sun has provided 64-bit features as the market has demanded them while guaranteeing compatibility for existing 32-bit applications.

    To determine what kind of binaries your Solaris machine can run, try the following:

    eden:/home/cph: isainfo -v
    64-bit sparcv9 applications
    32-bit sparc applications

    You can see that this Solaris machine is capable of running 32-bit as well as 64-bit applications. If isainfo fails, running a 64-bit application on your Sun will generally not be possible, unless of course isainfo is not in your path or has not been installed. You can also use the uname command to glean more information:

    eden:/home/cph: uname -a
    SunOS eden 5.8 Generic_108528-05 sun4u sparc SUNW,Ultra-5_10

    lagrange:/usr/users/cph: uname -a
    SunOS lagrange 5.5.1 Generic_103640-29 sun4u sparc SUNW,Ultra-1


    SunOS/Solaris versions map to the following:
    SunOS SOLARIS
    5.3 2.3
    5.4 2.4
    5.5 2.5
    5.5.1 2.5.1
    5.6 2.6
    5.7 or greater is 64-bit compliant 2.7 or greater is 64-bit compliant

    While all UltraSparc processors are capable of 64-bit computing, the OS release level may be the limiting factor. In the above excerpt, 'eden' (SunOS 5.8) is a fully compliant 64-bit platform, and 'lagrange' (SunOS 5.5.1) is a 64-bit UltraSparc limited to 32-bit computing.

Linux

Linux users should type the uname command. Depending on the platform, you may see

[cph@gaylord ~]$ uname -a
Linux gaylord.stata.com 2.6.11-1.27_FC3 #1 Tue May 17 20:24:57 EDT 2005 x86_64 x86_64 x86_64 GNU/Linux

[cph@caddo ~]$ uname -a
Linux caddo.stata.com 2.6.9-5.0.5.EL #1 SMP Fri Apr 8 14:20:58 EDT 2005 ia64 ia64 ia64 GNU/Linux

[cph@tango ~]$ uname -a
Linux tango.stata.com 2.6.10-1.771_FC2smp #1 SMP Mon Mar 28 01:10:51 EST 2005 i686 i686 i386 GNU/Linux
In the above listing, 'gaylord' (x86_64 GNU/Linux) and 'caddo' (ia64 GNU/Linux) are 64-bit compliant. 'tango' (i386 GNU/Linux) is only a 32-bit platform.

How To Check If Computer Is Running A 32 Bit or 64 Bit Operating System.

You can use the following registry location to check if computer is running 32 or 64 bit of Windows Operating System:

HKLM\HARDWARE\DESCRIPTION\System\CentralProcessor\0

You will see the following registry entries in the right pane:

Identifier         REG_SZ                     x86 Family 6 Model 14 Stepping 12
Platform ID    REG_DWORD          0x00000020(32)

The above “x86” and “0x00000020(32)” indicate that the Operating System version is 32 bit.

You can also a simple batch file to check the setting on remote computer:

*** Start ***

@echo off

Set RegQry=HKLM\Hardware\Description\System\CentralProcessor\0

REG.exe Query %RegQry% > checkOS.txt

Find /i "x86" < CheckOS.txt > StringCheck.txt

If %ERRORLEVEL% == 0 (
    Echo "This is 32 Bit Operating system"
) ELSE (
    Echo "This is 64 Bit Operating System"
)

*** End ***

You can use PSEXEC (a tool from Sysinternals) to run this script remotely redirect the output in a Text file.

To query registry entry on a remote computer you can use the following statement with Reg.exe:

Reg.exe Query \\computer_name\%Reg_Qry% > checkOS.txt

Please note that you can use the below registry entry to identify the processor architecture:

HKLM\SYSTEM\CurrentCongtrolSet\Control\Session Manager\Envirornment.

You can see the below registry entry in the right pane of the registry editor:

PROCESSOR_ARCHITECTURE   REG_SZ         x86

Friday, 14 October 2011

Improve VMware VM Performance by Defragmenting Virtual Disks

Have you noticed your VMware virtual machines sees like they’re sluggish and slow to respond?  Here’s how you can quickly defragment your virtual disks to make them fast as they were originally.
Just like a hard drive on a normal computer, the virtual hard drive on a virtual machine can become defragmented over time.  In fact, if your virtual disk is setup to dynamically expand over time, then fragmentation can become a serious problem, especially if your hard drive is low on free space.  You may notice your virtual machines running slower or being less responsive, and VMware itself may even notify you that your virtual disk is too fragmented.

Here’s what you’ll need to do.  First, while your virtual machine is running, run the default disk defragmenter as normal inside the virtual machine.  This may take some time if you haven’t done it in a while, and may also slow your whole computer down while it’s running.
image
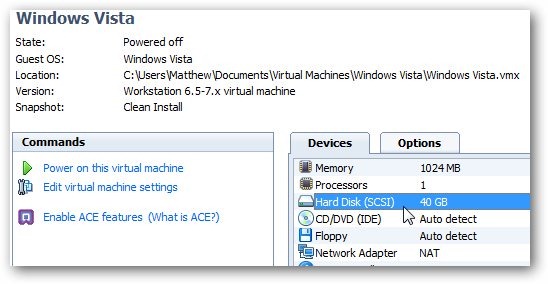
Once the virtual machine’s OS has finished defragmenting, shut down the virtual machine.  Then, open your VMware virtual disk properties.  To do this in VMware Workstation, double-click on the Hard Disk info on the virtual machine’s main page.
sshot-2010-10-07-1-15-12-08
Alternately, if you’re using VMware Player, right-click on the virtual machine’s name and select Virtual Machine Settings.
image
Then select the Hard Disk entry from the Hardware tab if it’s not already selected.  If your virtual machine has multiple virtual disks, you may wish to repeat these steps on each virtual disk.
image
Click the Utilities button
image
VMware will start defragmenting your virtual disk.  This may take a while depending on your virtual machine’s size and how often you defragment it.
image
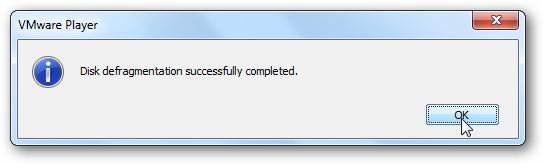
Once it’s done, you’ll be notified that the defragment is completed.
image
To improve performance even more, you should also regularly defragment your host computer’s hard drive.  This is not much of a problem in Windows 7 and Vista since they automatically keep your hard drive defragmented, but if you’re using XP, you might want to setup automatic disk defragmenting.  Alternately, if you’d like more defragmenting control, you can always run the defrag command in an elevated command prompt for a wide range of analysis and defrag options.
image
Most of us don’t think much about defragmenting virtual machines, but it can seriously improve your virtual machines’ performance.  We’re big fans of the free VMware Player, and if you have more advanced needs, VMware Workstation is a great option as well.  The great thing is, no matter which one you’re using, you can still keep your virtual machines running at top speed with a quick defrag. 

Make Virtual Machines Always Hide To The System Tray in VMware Workstation

My favorite feature in the latest version of VMware Workstation is that you can run virtual machines entirely in the background. This is most useful for “appliance” machines that you won’t actually use from the prompt, but through a web browser or ssh client. The only problem is that when you click the close button on the VMware window, you get a prompt saying “Some virtual machines are still powered on. You can continue to run these virtual machines in the background, suspend them for later use, or power them off now.
I always want my virtual machines to run in the background!
image
You can disable that window by just telling VMware to always run virtual machines in the background by going to Edit \ Preferences.
image
Click the checkbox that says “Run powered on virtual machines in background after close”. Now when you click the close button, it will always just minimize the virtual machines to the system tray. Very useful!

Access VirtualBox Virtual Machines from the Windows 7 Start Menu or Taskbar

If you open different virtual machines in VirtualBox often, you will like VBoxLaunch. It allows you to launch virtual machines directly from the Start menu using a jumplist without having to launch the VirtualBox Manager first.

00_vboxlaunch_on_start_menu

VBoxLaunch does not change any settings in VirtualBox or the interface. It reads the list of virtual machines available in the VirtualBox Manager and creates direct links to those virtual machines in the jumplist for VBoxLaunch on the Start menu or the Taskbar.
Extract the .zip file you downloaded (see the download link at the end of the article) and copy the VBoxLaunch.exe file.
01_copying_vboxlaunch
Paste the VBoxLaunch.exe file in the VirtualBox program directory (usually C:\Program Files\Oracle\VirtualBox). Right-click on the VBoxLaunch.exe file and select Create shortcut from the popup menu.
02_create_shortcut
You may not have the correct permissions to create files in the VirtualBox program directory. If that is the case, Windows asks if you want to place the shortcut on the desktop instead. That is fine, so click Yes. It doesn’t matter where the shortcut is placed.
03_cant_create_shortcut_here
Right-click on the shortcut (wherever it was created) and select Pin to Start Menu.
NOTE: If you want to also access your virtual machines from the Taskbar, right-click the shortcut again and select Pin to Taskbar, as well.
04_pinning_to_start_menu
To create the jumplist containing links to your VirtualBox virtual machines, you must start VBoxLaunch once to open the VirtualBox Manager and then exit. Start VBoxLaunch from the Start menu or Taskbar.
05_starting_vboxlaunch
If the Open File – Security Warning dialog box displays, click Run to open the VirtualBox Manager.
06_security_warning_dialog
Select Exit from the File menu to close the VirtualBox Manager.
07_closing_virtualbox
Now, when you move your mouse over the VBoxLaunch Start menu item, a jumplist displays with all your available virtual machines listed. Simply select a virtual machine to open it without having to open the VirtualBox Manager first.
08_opening_vm_with_vboxlaunch
The jumplist is also available from the Taskbar if you pinned the VBoxLaunch shortcut there.
09_opening_vm_from_taskbar
The Manage virtual machines item under Tasks on the jumplist opens the VirtualBox Manager. This allows you to remove any shortcuts to the VirtualBox Manager you had. All you need is the VBoxLaunch shortcut pinned to the Start menu or Taskbar.
Download VBoxLaunch from http://nicbedford.co.uk/software/vboxlaunch/.
VBoxLaunch requires the Microsoft .NET Framework 3.5, which should already exist in Windows 7. If, for some reason, you do not have the Microsoft .NET Framework, you can download it from http://www.microsoft.com/download/en/details.aspx?id=22. We tested VBoxLaunch on Windows 7 Ultimate 64-bit, but the developer says it should also work on 32-bit systems.

Share Files and Printers between Windows 7 and XP

If you have a home network and are running Windows 7 and have XP on other PC(s) you might want to share files between them.  Today we will look at the steps to share files and hardware devices like a printer.
Sharing Files In Windows 7 and XP
Sharing folders between two Windows 7 machines with the new HomeGroup feature is an easy process, but the HomeGroup feature is not compatible with Vista or XP.  For this tutorial we are using Windows 7 x64 RC1 and XP Professional SP3 connected through a basic Linksys home wireless router. 
First make sure both machines are members of the same Workgroup which by default is named Workgroup.
workgroup 
On the Windows 7 machine go into Control Panel \ All Control Panel Items \ Network and Sharing Center then click on Change advanced sharing settings.
network and sharing
advanced
You will want to verify the following settings under Advanced Sharing Settings for the Home or Work and Public profile.
home or work settings
If you want any user to have access the public shares turn off password protection.  This is located in Advanced Sharing Settings toward the bottom of the list. 
 turn off pw
If you want to keep it enabled make sure there is a log in account for the other XP machines and they have a password.
create pw
Now if you go into Network in Windows 7 you should see your XP machine and the Windows 7 as well which in this case is Mysticgeek-PC.
Explorer
To share the printer on the Windows 7 machine go into Devices and Printers from the Start menu and double click on the printer icon.
devices
Next double click on “Customize your printer”.
1 Printer
In the Properties screen click on the Sharing Tab and check the box to share the printer and type in its share name.
2 printer share
If your XP machine is an x86 OS you can install Additional Drivers before setting up the XP machine.
3 Printer add drivers 
To find the shared folders and devices double click on the Windows 7 machine icon under Network.  Here you can see the printer connected to my Windows 7 machine is shared and also the Users Folder.
shared device and users
Continue into the Users folder and Public to see the shared folders, here I also created a folder called XP Share just to keep everything in central location.
xpshare
Over on your XP machine open up My Network Places to find the Windows 7 (mysticgeek-pc) shared folder.
My Network Places
Double click on the Share folder to find a list of shared folders in the Public folder on Windows 7.  If you have password protection enabled you will need to type in the username and password of the user account on the Windows 7 machine first. 
folders
Setup XP With Shared Printer
To set up the shared printer in XP you will need to go into Printers and Faxes from the Start menu and kick off the Add Printer Wizard.
add Printer
Now select “A network printer, or a printer attached to another computer” then hit Next.
network option
Next select “Connect to this printer…” and type in the path for the printer connected to the Windows 7 machine and click next.  
print
Now click Yes to the confirmation message.
confirm msg
Then click Finish the printer to install and complete the Wizard.
Complete
In some cases you will need to install the x86 XP drivers for the shared printer because the Windows 7 drivers are not compatible with XP.  When everything is installed open up Printers and Faxes to find the shared printer.
in explorer
This should help you get started with sharing your files and other devices with your Windows 7 machine.  When I first started I was able to see the printer on XP right away because I had a HomeGroup set up, but once I deleted it I needed to share the printer like you would for a workgroup.  You might also have to do a couple restarts of the XP machine for it to see the shared resources on Windows 7.  If you have had any experiences with sharing between Windows 7 and XP leave us a comment!
Browser Name:
Browser Version:
Browser Code Name:
User-Agent: