Thursday, 22 September 2011

Next-generation firewalls

If there is a simple way to describe the difference between a next-generation firewall and a traditional firewall, it is "more detailed controls." In firewall terms, people talk about "widening the 5-tuple."

Firewall managers like to use the term "5-tuple," borrowing "tuple" from the world of databases. The "5-tuple" means the five items (columns) that each rule (row, or tuple) in a firewall policy uses to define whether to block or allow traffic: source and destination IP, source and destination port, and protocol.
For example, to allow traffic to a Web server at 1.2.3.4 from the Internet, a typical 5-tuple would include source IP and port of "any" (or "*"), destination IP of 1.2.3.4, destination ports of 80 and 443, and destination protocol of TCP — with an action of "allow." There's variation in every firewall on the market, but at the core of every one you'll find a set of rules that look more-or-less like that: 5-tuples.
Next-generation firewalls "widen" the firewall rule base by adding elements (columns) to each 5-tuple, starting with "application" and "user identity" and perhaps going wider still, factoring in other elements such as "reputation."

Essential open source tools for Windows admins

You might imagine that the best place to go for improving your Microsoft server-side experience is to the mothership itself. In many cases, you would be right. But the truth is there are a meaningful number of open source tools that go above and beyond what Microsoft has to offer in support of Windows Server, Exchange, SQL, and SharePoint. Many of these alternatives provide -- for free -- more powerful capabilities than what you'd get with third-party retail products.
Microsoft itself has acknowledged this fact, facilitating the availability of open source tools for Microsoft admins through its CodePlex site. Microsoft, too, can be relied on for a few clear winners when it comes to free tools.

All in all, it's never been a better time to experiment with open source tools in your Microsoft environment. From networking troubleshooting to security to performance analysis, we've compiled a list of the top open source tools for your Windows-based systems. Don't see a favorite? Feel free to highlight it in the comments below.
Essential open source Windows admin tool No. 1: Wireshark
Network troubleshooting is a real art, one that requires solid training and years of hands-on experience. But a tool like Wireshark helps ease traffic analysis, thanks to many powerful features. Just one look at this free software-based protocol analyzer's color-coding features and you'll see how its superior usability makes Wireshark a worthwhile tool for any Microsoft shop. 


Essential open source Windows admin tool No. 2: AMANDA
Admins looking to ease the pain of backing up Windows-based systems should check out AMANDA, aka Advanced Maryland Automatic Network Disk Archiver. AMANDA provides the ability for an administrator to set up a single master backup server that can support both Windows desktops and servers over the network to a variety of media, including tape drives, disks, or optical media.
ZMANDA maintains and supports the freely available AMANDA, as well as ZMANDA Recovery Manager for MySQL. It also provides network and cloud backup services that it sells commercially. 

Download: www.amanda.org

Essential open source Windows admin tool No. 3: MailArchiva
Email archiving is front and center in Exchange 2010, thanks to the increase in compliance regulation enforcement across the industry. But for those who are not yet using Exchange 2010, MailArchiva provides a worthwhile means for bringing compliance to Exchange 2000/2003 and other mail servers, such as Postfix, Sendmail, Qmail, iMail, and Lotus Notes.
MailArchiva comes in both an open source and an enterprise flavor. To see a list of features and how the two editions vary, browse the MailArchiva site. 


Essential open source Windows admin tool No. 4: Exchange 2010 RBAC Manager
Exchange 2010 RBAC Manager is a great tool for admins working with role-based access control and Exchange. RBAC Manager (aka RBAC Editor GUI) helps overcome the lack of a GUI tool to work with the new role-based administration side to Exchange, enabling admins to connect, whether or not you're a PowerShell master. The tool is written in C# and uses PowerShell behind the scenes to allow you to create and manage roles in your Exchange 2010 environment. 


Essential open source Windows admin tool No. 5: Core Configurator 2.0 for Server Core
Offering a command-line version of Windows Server 2008 and Windows Server 2008 R2 at installation was a great idea. With its light footprint, it allows a small attack surface as well. The only problem? It required administrators to crack open command-line books to configure their servers. This free tool provides a GUI method for managing tasks. 


Essential open source Windows admin tool No. 6: AutoSPInstaller for SharePoint 2010
Anyone who has ever installed SharePoint knows that the SQL databases created are a mess in terms of naming, resulting in large GUID databases titles that are completely inconsistent. In contrast, AutoSPInstaller utilizes a variety of scripts to install SharePoint and makes sure database names remain clean in the process. 


Essential open source Windows admin tool No. 7: OCS Inventory
If you need a cool tool for locating all the devices connected to your network and what software and hardware you have installed on your systems, then OCS-NG is the one for you. It requires you install the OCS client inventory agent on your systems; you can then pull all that information into a repository that's easy to visualize and search. 


Essential open source Windows admin tool No. 8: UltraDefrag
UltraDefrag is a tool for Windows that can defrag system files, registry hives, and the paging file. It's continually updated to ensure improvements in performance.
UltraDefrag is fully compatible with Windows NT 4.0, Windows 2000, Windows XP, Windows Server 2003, Windows Vista, Windows Server 2008, Windows 7, and all of the 64-bit editions of Windows. It's a valuable addition to any Windows environment. 


Essential open source Windows admin tool No. 9: Nmap for Windows
Originally a Unix-only tool, Nmap for Windows has been an important security resource for Windows shops for more than 10 years. This security scanner and network mapper can also be used to perform network inventory, manage service upgrade schedules, and monitor host or service uptime. It supports Windows 7, Windows Server 2008 and 2003, Windows Vista, and Windows XP SP1 and later. 


Essential open source Windows admin tool No. 10: Zenmap
Zenmap is a cool tool for mapping a topology of devices connected to your network. This security scanner works off of Nmap, providing an interactive, animated visualization of hosts on a network, configured in rings. Click on a host and it moves to the center of your network topology, giving you the ability to easily trace the host's various connections. With Zenmap, information regarding potential vulnerabilities becomes that much easier to pinpoint, ensuring your firewalls and routers are working correctly.

Wednesday, 21 September 2011

The Difference Between a Computer Virus, Worm and Trojan Horse

Viruses, worms and Trojan Horses are all malicious programs that can cause damage to your computer, but there are differences among the three.

One common mistake that people make when the topic of a computer virus arises is to refer to a worm or Trojan horse as a virus. While the words Trojan, worm and virus are often used interchangeably, they are not exactly the same thing. Viruses, worms and Trojan Horses are all malicious programs that can cause damage to your computer, but there are differences among the three, and knowing those differences can help you better protect your computer from their often damaging effects.

What Is a Virus?

A computer virus attaches itself to a program or file enabling it to spread from one computer to another, leaving infections as it travels. Like a human virus, a computer virus can range in severity: some may cause only mildly annoying effects while others can damage your hardware, software or files. Almost all viruses are attached to an executable file, which means the virus may exist on your computer but it actually cannot infect your computer unless you run or open the malicious program. It is important to note that a virus cannot be spread without a human action, (such as running an infected program) to keep it going. Because a virus is spread by human action people will unknowingly continue the spread of a computer virus by sharing infecting files or sending emails with viruses as attachments in the email.

What Is a Worm?

A worm is similar to a virus by design and is considered to be a sub-class of a virus. Worms spread from computer to computer, but unlike a virus, it has the capability to travel without any human action. A worm takes advantage of file or information transport features on your system, which is what allows it to travel unaided.
The biggest danger with a worm is its capability to replicate itself on your system, so rather than your computer sending out a single worm, it could send out hundreds or thousands of copies of itself, creating a huge devastating effect. One example would be for a worm to send a copy of itself to everyone listed in your e-mail address book. Then, the worm replicates and sends itself out to everyone listed in each of the receiver's address book, and the manifest continues on down the line. 
Due to the copying nature of a worm and its capability to travel across networks the end result in most cases is that the worm consumes too much system memory (or network bandwidth), causing Web servers, network servers and individual computers to stop responding. In recent worm attacks such as the much-talked-about Blaster Worm, the worm has been designed to tunnel into your system and allow malicious users to control your computer remotely.

What Is a Trojan horse?

A Trojan Horse is full of as much trickery as the mythological Trojan Horse it was named after. The Trojan Horse, at first glance will appear to be useful software but will actually do damage once installed or run on your computer.  Those on the receiving end of a Trojan Horse are usually tricked into opening them because they appear to be receiving legitimate software or files from a legitimate source.  When a Trojan is activated on your computer, the results can vary. Some Trojans are designed to be more annoying than malicious (like changing your desktop, adding silly active desktop icons) or they can cause serious damage by deleting files and destroying information on your system. Trojans are also known to create a backdoor on your computer that gives malicious users access to your system, possibly allowing confidential or personal information to be compromised. Unlike viruses and worms, Trojans do not reproduce by infecting other files nor do they self-replicate.

What Are Blended Threats?

Added into the mix, we also have what is called a blended threat. A blended threat is a more sophisticated attack that bundles some of the worst aspects of viruses, worms, Trojan horses and malicious code into one single threat. Blended threats can use server and Internet vulnerabilities to initiate, then transmit and also spread an attack. Characteristics of blended threats are that they cause harm to the infected system or network, they propagates using multiple methods, the attack can come from multiple points, and blended threats also exploit vulnerabilities.
To be considered a blended thread, the attack would normally serve to transport multiple attacks in one payload. For example it wouldn't just launch a DoS attack — it would also, for example, install a backdoor and maybe even damage a local system in one shot. Additionally, blended threats are designed to use multiple modes of transport. So, while a worm may travel and spread through e-mail, a single blended threat could use multiple routes including e-mail, IRC and file-sharing sharing networks.
Lastly, rather than a specific attack on predetermined .exe files, a blended thread could do multiple malicious acts, like modify your exe files, HTML files and registry keys at the same time — basically it can cause damage within several areas of your network at one time.
Blended threats are considered to be the worst risk to security since the inception of viruses, as most blended threats also require no human intervention to propagate.

Tips to Combat Viruses, Worms and Trojan Horses on Your Computer

Keep The Operating System Updated

The first step in protecting your computer from any malicious there is to ensure that your operating system (OS) is up-to-date. This is essential if you are running a Microsoft Windows OS. Secondly, you need to have anti-virus software installed on your system and ensure you download updates frequently to ensure your software has the latest fixes for new viruses, worms, and Trojan horses. Additionally, you want to make sure your anti-virus program has the capability to scan e-mail and files as they are downloaded from the Internet, and you also need to run full disk scans periodically. This will help prevent malicious programs from even reaching your computer.

Use a Firewall

You should also install a firewall. A firewall is a system that prevents unauthorized use and access to your computer. A firewall can be either hardware or software. Hardware firewalls provide a strong degree of protection from most forms of attack coming from the outside world and can be purchased as a stand-alone product or in broadband routers. Unfortunately, when battling viruses, worms and Trojans, a hardware firewall may be less effective than a software firewall, as it could possibly ignore embedded worms in out going e-mails and see this as regular network traffic.
For individual home users, the most popular firewall choice is a software firewall.  A good software firewall will protect your computer from outside attempts to control or gain access your computer, and usually provides additional protection against the most common Trojan programs or e-mail worms. The downside to software firewalls is that they will only protect the computer they are installed on, not a network.
It is important to remember that on its own a firewall is not going to rid you of your computer virus problems, but when used in conjunction with regular operating system updates and a good anti-virus scanning software, it will add some extra security and protection for your computer or network. 

How To Set Password In WinRar File

Here I will show you how to set password in WinRar file,you can set it on any file open only when you enter your password.
First select Folder/Folders or File/Files you
want to make Rar.your file must be unzipped,not already in .Rar format in this tutorial i setect folder name how-2-do.blogspot.com


# Assuming you already have WinRar installed,right click and go to "Add to archive"


# Assuming you already have WinRar installed,right click and go to "Add to archive"


# When that comes up, go to the second tab, which is "Advanced" and hit "set password"


# Enter the password you want,here i am enter password http://how-2-do.blogspot.com/ and hit OK


# Again Hit OK on main Tab


# Here you see file in WinRar Format, Which open only when i enter my Password

Enjoy...

How To Get SSH Command-Line Access to Windows 7 Using Cygwin

banner
Are you comfortable with Linux/Unix and want SSH access to your Windows 7 machine? Cygwin provides this functionality and gives you a familiar environment to work with in a few simple steps.
We’re assuming you’ve got Cygwin installed and configured.

Installing OpenSSH

OpenSSH is what we’ll be using, so if you don’t have it installed, find Cygwin’s setup.exe file and run it.
17-open setup
You can keep all of the same defaults as when you originally set up Cygwin. On the package selection screen, search for “open” and look under the “Net” menu.
18-install openssh
You’ll see a package called “openssh”. Click under the “New” column, where it says “Skip” until you see an X appear in the “Bin?” column. Look at the previous screenshot for where to click if you’re confused. Hit “Next” and finish up the rest of the setup process, just like you did last time.

Configuring OpenSSH in Cygwin

Unlike in most Linux distros, OpenSSH won’t automatically configure itself to run and just work. We need to perform a few easy steps. First, right-click your Cygwin shortcut, and click on “Run as administrator”:
00-run as admin
This will make sure we have the proper privileges for everything. You’ll see an empty Cygwin window come up.
01-cygwin window
Enter the following command:
ssh-host-config
02-ssh-host-config
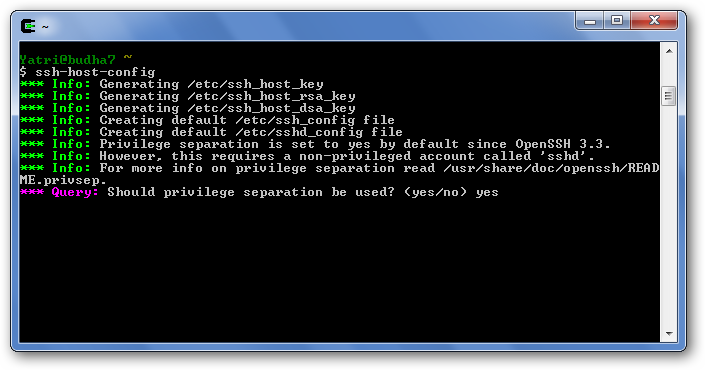
You’ll see the script generate some default files, and then you’ll be prompted for whether or not you want to enable “Privilege Separation.” It’s on by default in standard installations of OpenSSH on other systems, so go ahead and say “yes” to the prompt.
03-priv sep
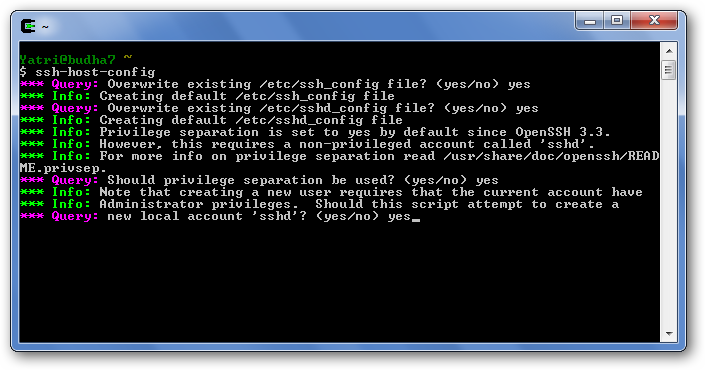
You’ll be prompted to create a new account with special privileges. Select “yes” and the script will continue.
04-new acct
Next, you’ll be asked if you want sshd to run as a service. This will allow you to get SSH access regardless of whether or not Cygwin is currently running, which is what we want. Go ahead and hit “yes” to continue.
05-sshd as service
Next, you’ll be asked to enter a value for the daemon. Enter the following:
ntsec
06-daemon ntsec
You’ll see the script give you some information on your system and then it will ask you to create a privileged account with the default username “cyg_server”. The default works well, so type “no” when it asks you if you want to use a different account name, although you can change this if you really like.
07-priv acct cyg_server
Of course, you’ll have to enter a password for this account as well.
08-password
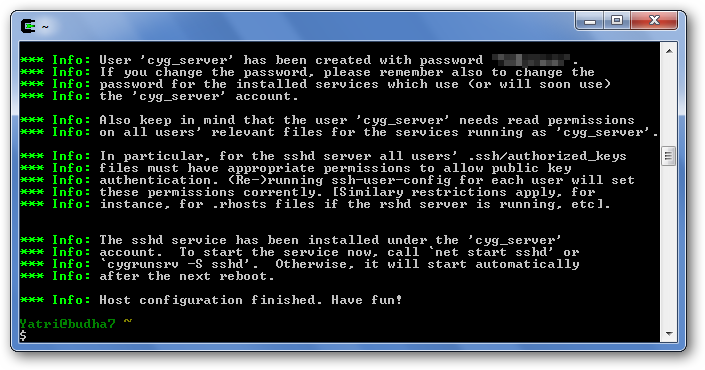
Cygwin will show you your password in plain text for verification, so be sure you’re in a secure place. You’ll see some extra info come up and if all’s well, you’ll get a message that says it successfully completed.
09-fin host config
You can either restart, or enter the following command to start the sshd service:
net start sshd
10-net start sshd
Now, you can type “exit” to close this Cygwin instance.

User Configuration of SSH

Next, we’ll create the appropriate SSH keys for your user account. Open up Cygwin normally, and enter the following command:
ssh-user-config
11-ssh-user-config
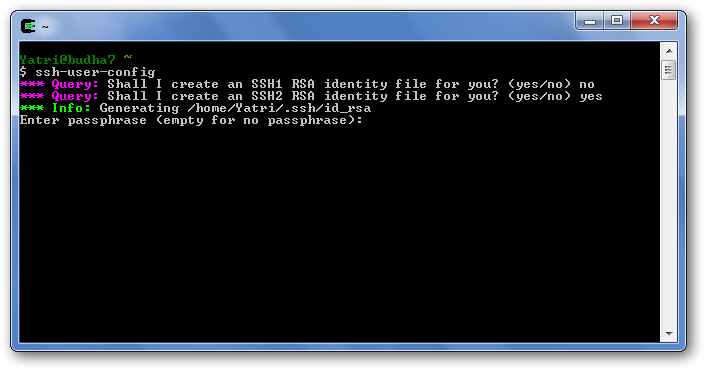
You’ll be asked to create specific keys for your user account, so use what you need. I went ahead and said “no” to the first question, and “yes” to the second.
12-passphrase
SSH2 is more secure, so that’s what I recommend to you. After entering a password, you’ll be asked if you want to use that ID to access your machine. Type “yes”.
13-use this id
Next, you’ll be asked to create an SSH2 DSA ID file, if you want to use password-less access. I declined at this step.
14-no to dsa
That’s it! You’re all configured. If you want to test your configuration really quickly, enter the following command in your Cygwin window:
ssh –v localhost
15-test
The –v option stands for “verbose” and gives you all of the details of the process. You’ll be asked if you want to continue connecting, so enter “yes” and then enter your password at the prompt. Remember that when you enter your username, it is case-sensitive!
16-exit
If everything worked out well, you’ll see a normal bash prompt.

Minor Issues

If you find yourself stuck at any of the configuration steps, make sure that the Windows User Account you’re running has Administrative access. You may get weird errors if you try to run the host configuration as a normal user, so make sure you run Cygwin with admin privileges during that step. If, when you exit, you get a prompt about leaving your batch jobs running, you can hit “no” to terminate them.
Lastly, if you test SSH access from another machine and get an error, make sure that your firewall isn’t blocking access to port 22 (or 23 if you’re using SFTP).

How To Remotely Copy Files Over SSH Without Entering Your Password

banner-01
SSH is a life-saver when you need to remotely manage a computer, but did you know you can also upload and download files, too? Using SSH keys, you can skip having to enter passwords and use this for scripts!
This process works on Linux and Mac OS, provided that they’re properly configured for SSH access. If you’re using Windows, you can use Cygwin to get Linux-like functionality, and with a little tweaking, SSH will run as well.

Copying Files Over SSH

Secure copy is a really useful command, and it’s really easy to use. The basic format of the command is as follows:
scp [options] original_file destination_file
The biggest kicker is how to format the remote part. When you address a remote file, you need to do it in the following manner:
user@server:path/to/file
The server can be a URL or an IP address. This is followed by a colon, then the path to the file or folder in question. Let’s look at an example.
scp –P 40050 Desktop/url.txt yatri@192.168.1.50:~/Desktop/url.txt
This command features the [-P] flag (note that it’s a capital P). This allows me to specify a port number instead of the default 22. This is necessary for me because of the way I’ve configured my system.
Next, my original file is “url.txt” which is inside of a directory called “Desktop”. The destination file is in “~/Desktop/url.txt” which is the same as “/user/yatri/Desktop/url.txt”. This command is being run by the user “yatri” on the remote computer “192.168.1.50”.
ssh 1
What If you need to do the opposite? You can copy files from a remote server similarly.
ssh 2
Here, I’ve copied a file from the remote computer’s “~/Desktop/” folder to my computer’s “Desktop” folder.
To copy whole directories, you’ll need to use the [-r] flag (note that it’s a lowercase r).
scp recursive
You can also combine flags. Instead of
scp –P –r …
You can just do
scp –Pr …
The toughest part here is that tab completion doesn’t always work, so it’s helpful to have another terminal with an SSH session running so that you know where to put things.

SSH and SCP Without Passwords

Secure copy is great. You can put it in scripts and have it do backups to remote computers. The problem is, that you may not always be around to enter the password. And, let’s be honest, it’s a real big pain to put in your password to a remote computer you obviously have access to all the time.
Well, we can get around using passwords by using key files. We can have the computer generate two key files – one public that belongs on the remote server, and one private which is on your computer and needs to be secure – and these will be used instead of a password. Pretty convenient, right?
On your computer, enter the following command:
ssh-keygen –t rsa
This will generate the two keys and put them in:
~/.ssh/
with the names “id_rsa” for your private key, and “id_rsa.pub” for your public key.
keygen 1
After entering the command, you’ll be asked where to save the key. You can hit Enter to use the above-mentioned defaults.
Next, you’ll be asked to enter a passphrase. Hit Enter to leave this blank, then do it again when it asks for confirmation. The next step is to copy the public key file to your remote computer. You can use scp to do this:
keygen 2
The destination for your public key is on the remote server, in the following file:
~/.ssh/authorized_keys2
Subsequent public keys can be appended to this file, much like the ~/.ssh/known_hosts file. This means that if you wanted to add another public key for your account on this server, you would copy the contents of the second id_rsa.pub file into a new line on the existing authorized_keys2 file.

Security Considerations

Isn’t this less secure than a password?
In a practical sense, not really. The private key that’s generated is stored on the computer you’re using, and it is never transferred, not even to be verified. This private key ONLY matches with that ONE public key, and the connection needs to be started from the computer that has the private key. RSA is pretty secure and uses a 2048 bit-length by default.
It’s actually pretty similar in theory to using your password. If someone has knows your password, your security goes out of the window. If someone has your private key file, then security is lost to any computer that has the matching pubic key, but they need access to your computer to get it.
Can this be more secure?
You can combine a password with key files. Follow the steps above, but enter a strong passphrase. Now, when you connect over SSH or use SCP, you’ll need the proper private key file as well as the proper passphrase.
Once you enter your passphrase once, you won’t be asked again for it until you close your session. That means that the first time you SSH/SCP, you’ll need to enter your password, but all subsequent actions won’t require it. Once you log out of your computer (not the remote one) or close your terminal window, then you’ll have to enter it again. In this way, you’re not really sacrificing security, but you’re also not harassed for passwords all the time.
sshot-1
Can I reuse the public/private key pair?
This is a really bad idea. If someone finds your password, and you use the same password for all of your accounts, then they now have access to all of those accounts. Similarly, your private key file is also super-secret and important.
It’s best to create new key pairs for every computer and account you want to link. That way, if one of your private keys get caught somehow, then you’ll only compromise one account on one remote computer.
It’s also really important to note that all of your private keys are stored in the same place: in ~/.ssh/ on your computer

Learn the Ins and Out of OpenSSH on Your Linux PC

banner-bad-warning
We’ve extolled the virtues of SSH numerous times, for both security and remote access. Let’s take a look at the server itself, some important “maintenance” aspects, and some quirks that can add turbulence to an otherwise smooth ride.
While we’ve written this guide with Linux in mind, this can also apply to OpenSSH in Mac OS X and Windows 7 via Cygwin.

Why It’s Secure

We’ve mentioned many times how SSH is a great way to securely connect and tunnel data from one point to another. Let’s take a very brief look at how things work so you get a better idea of why things can go weird sometimes.
sshot-2
When we decide to initiate a connection to another computer, we often use protocols that are easy to work with. Telnet and FTP both come to mind. We send out information to a remote server and then we get confirmation back about our connection. In order to establish some type of safety, these protocols often use username and password combinations. That means they’re totally secure, right? Wrong!
If we think of our connecting process as mail, then using FTP and Telnet and the like isn’t like using standard mailing envelopes. It’s more like using postcards. If someone happens to step in the middle, they can see all of the information, including the addresses of both correspondents and the username and password sent out. They can then change the message, keeping the information the same, and impersonate one correspondent or the other. This is known as a “man-in-the-middle” attack, and not only does it compromise your account, but it calls into question each and every message sent and file received. You can’t be sure if you’re talking to the sender or not, and even if you are, you can’t be sure no one’s looking at everything from in between.
Now, let’s look at SSL encryption, the kind that makes HTTP more secure. Here, we have a post office that handles the correspondence, who checks to see if your recipient is who he or she claims to be, and has laws protecting your mail from being looked at. It’s more secure overall, and the central authority – Verisign is one, for our HTTPS example – makes sure that the person who you’re sending mail to checks out. They do this by not allowing postcards (unencrypted credentials); instead they mandate real envelopes.
sshot-1
Finally, let’s look at SSH. Here, the setup is a little different. We don’t have a central authenticator here, but things are still secure. That’s because you’re sending letters to someone whose address you already know – say, by chatting with them on the telephone – and you’re using some really fancy math to sign your envelope. You hand it over to your brother, girlfriend, dad, or daughter to take it to the address, and only if the recipient’s fancy math matches do you assume that the address is what it should be. Then, you get a letter back, also protected from prying eyes by this awesome math. Finally, you send your credentials in another secretive algorithmically-enchanted envelope to the destination. If the math doesn’t match, we can assume that the original recipient moved and we need to confirm their address again.
With the explanation as long as it is, we think we’ll cut it there. If you have some more insight, feel free to chat in the comments, of course. For now, though, let’s look at the most relevant feature of SSH, host authentication.

Host Keys

Host authentication is essentially the part where someone you trust takes the envelope (sealed with magic math) and confirms the address of your recipient. It’s a pretty detailed description of the address, and it’s based on some complicated math that we will just skip right over. There are a couple of important things to take away from this, though:
  1. Since there is no central authority, the real security lies in the host key, the public keys and the private keys. (These latter two keys are configured when you’re given access to the system.)
  2. Usually, when you connect to another computer via SSH, the host key is stored. This makes future actions faster (or less verbose).
  3. If the host key changes, you will most likely be alerted and you should be wary!
Since the host key is used before authentication to establish the identity of the SSH server, you should be sure to check the key before you connect. You will see a confirmation dialog like below.
banner warning
You shouldn’t worry, though! Often when security is a concern, there will be a special place that the host key (ECDSA fingerprint above) can be confirmed. In entirely online ventures, often it will be on a secure log-in only site. You may have to (or choose to!) phone your IT department to confirm this key over the phone. I’ve even heard of some places where the key is on your work badge or on the special “Emergency Numbers” list. And, if you have physical access to the target machine, you can also check for yourself!

Checking Your System’s Host Key

There are 4 types kinds of encryption algorithms used to make keys, but the default for OpenSSH as of earlier this year is ECDSA (with some good reasons). We’ll focus on that one today. Here’s the command you can run on the SSH server you have access to:
ssh-keygen -f /etc/ssh/ssh_host_ecdsa_key.pub -l
Your output should return something like this:
256 ca:62:ea:7c:e4:9e:2e:a6:94:20:11:db:9c:78:c3:4c /etc/ssh/ssh_host_ecdsa_key.pub
The first number is the bit-length of the key, then is the key itself, and finally you have the file it’s stored in. Compare that middle portion to what you see when you’re prompted to log in remotely. It should match, and you’re all set. If it doesn’t, then something else could be happening.
You can view all of the hosts you have connected to via SSH by looking at your known_hosts file. It is usually located at:
~/.ssh/known_hosts
You can open that in any text editor. If you look, try to pay attention to how keys are stored. They’re stored with the host computer’s name (or web address) and its IP address.

Changing Host Keys and Problems

There are a few reasons why host keys change or they don’t match what is logged in your known_hosts file.
  • The system was re-installed/re-configured.
  • The host keys were manually changed due to security protocols.
  • The OpenSSH server updated and is using different standards due to security issues.
  • The IP or DNS lease changed. This often means you’re trying to access a different computer.
  • The system was compromised in some way such that the host key changed.
Most likely, the issue is one of the first three, and you can ignore the change. If the IP/DNS lease changed, then there may be an issue with the server and you may be routed to a different machine. If you’re not sure what the reason for the change is then you should probably assume it’s the last one on the list.

How OpenSSH Handles Unknown Hosts

confirm
OpenSSH has a setting for how it handles unknown hosts, reflected in the variable “StrictHostKeyChecking” (without quotes).
Depending on your configuration, SSH connections with unknown hosts (whose keys aren’t already in your known_hosts file) can go three ways.
  • StrictHostKeyChecking is set to no ; OpenSSH will automatically connect to any SSH server regardless of host key status. This is insecure and not recommended, except if you’re adding a bunch of hosts after a reinstall of your OS, after which you will change it back.
  • StrictHostKeyChecking is set to ask ; OpenSSH will show you new host keys and ask for confirmation before adding them. It will prevent connections from going to changed host keys. This is the default.
  • StrictHostKeyChecking is set to yes ; The opposite of “no,” this will prevent you from connecting to any host that is not already present in your known_hosts file.
You can change this variable easily on the command-line by using the following paradigm:
ssh -o 'StrictHostKeyChecking [option]' user@host
Replace [option] with “no,” “ask,” or “yes.” Be aware that there are single straight quotes surrounding this variable and its setting. Also replace user@host with the username and host name of the server you’re connecting to. For example:
ssh -o 'StrictHostKeyChecking ask' yatri@192.168.1.50

Blocked Hosts Due To Changed Keys

If you have a server you’re trying to access that had its key already changed, the default OpenSSH configuration will prevent you from accessing it. You could change the StrictHostKeyChecking value for that host, but that wouldn’t be entirely, thoroughly, paranoidly secure, would it? Instead, we can simply remove the offending value from our known_hosts file.
bad warning
That’s definitely an ugly thing to have on your screen. Luckily, our reason for this was a reinstalled OS. So, let’s zoom in on the line we need.

There we go. See how it cites the file we need to edit? It even gives us the line number! So, let’s open up that file in Nano:
command
1st line
Here’s our offending key, in line 1. All we need to do is hit Ctrl + K to cut out the whole line.
after 1st line
That’s much better! So, now we hit Ctrl + O to write out (save) the file, then Ctrl + X to exit.
Now we get a nice prompt instead, to which we can simply respond with “yes.”
all done

Creating New Host Keys

For the record, there’s really not too much of a reason for you to change your host key at all, but if you ever find the need, you can do easily.
First, change to the appropriate system directory:
cd /etc/ssh/
This is usually where the global host keys are, though some distros have them placed elsewhere. When in doubt check your documentation!
Next, we’ll delete all of the old keys.
sudo rm /etc/ssh/ssh_host_*
Alternatively, you may want to move them to a safe backup directory. Just a thought!
Then, we can tell OpenSSH server to reconfigure itself:
sudo dpkg-reconfigure openssh-server
You’ll see a prompt while your computer creates its new keys. Ta-da!
creating keys

Now that you know how SSH works a little bit better, you should be able to get yourself out of tough spots. The “Remote Host Identification Has Changed” warning/error is something that throws a lot of users off, even those who are familiar with the command-line.
For bonus points, you can check out How To Remotely Copy Files Over SSH Without Entering Your Password. There, you’ll learn a little more about the other kinds of encryption algorithms and how to use key files for added security.
Browser Name:
Browser Version:
Browser Code Name:
User-Agent: