Friday, 14 October 2011

Raise the forest function level in a Windows Server 2003-based Active Directory

How can I raise the forest function level in a Windows Server 2003-based Active Directory?

Active Directory Management Software will be part of Spiceworks’s 5.0 release in Sept 2010. Spiceworks’ Active Directory will let you manage user accounts and passwords, link devices to specific users, and view all help tickets opened by a specific user. All for free!

Download Spiceworks 4.7 now, and you’ll be automatically alerted when Spiceworks 5.0 is available - and it will still be free!
Functional levels are an extension of the mixed/native mode concept introduced in Windows 2000 to activate new Active Directory features after all the domain controllers in the domain or forest are running the Windows Server 2003 operating system.
When a computer that is running Windows Server 2003 is installed and promoted to a domain controller, new Active Directory features are activated by the Windows Server 2003 operating system over its Windows 2000 counterparts. Additional Active Directory features are available when all domain controllers in a domain or forest are running Windows Server 2003 and the administrator activates the corresponding functional level in the domain or forest (read Understanding Function Levels in Windows Server 2003 Active Directory for more info).
To activate the new domain features, all domain controllers in the domain must be running Windows Server 2003. After this requirement is met, the administrator can raise the domain functional level to Windows Server 2003 (read Raise Domain Function Level in Windows Server 2003 Domains for more info).
To activate new forest-wide features, all domain controllers in the forest must be running Windows Server 2003, and the current forest functional level must be at Windows 2000 native or Windows Server 2003 domain level. After this requirement is met, the administrator can raise the domain functional level.
Note: Network clients can authenticate or access resources in the domain or forest without being affected by the Windows Server 2003 domain or forest functional levels. These levels only affect the way that domain controllers interact with each other.
Important
Do not raise the forest functional level if you have, or will have, any domain controllers running Windows NT 4.0 or Windows 2000. As soon as the forest functional level is raised to Windows Server 2003, it cannot be changed back to the Windows 2000 forest functional level.
To raise the forest functional level, you must be a member of the Enterprise Admins group.
In order to raise the Forest Functional Level:
  1. Log on to the PDC of the forest root domain with a user account that is a member of the Enterprise Administrators group.
  2. Open Active Directory Domains and Trusts, click Start, point to All Programs, point to Administrative Tools, and then click Active Directory Domains and Trusts.
  3. In the console tree, right-click Active Directory Domains and Trusts, and then click Raise Forest Functional Level


Under Select an available forest functional level, click Windows Server 2003.

and then click Raise to raise the forest functional level to Windows Server 2003.

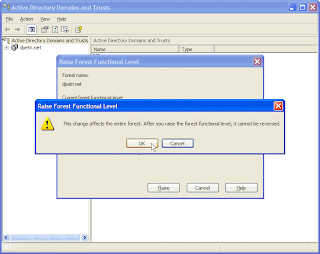
  1. Read the warning message, and if you wish to perform the action, click Ok.
  2.  You will receive an acknowledgement message telling you that the operation was completed successfully. Click Ok.
  1. You can check the function level by performing step 3 again and viewing the current function level.
  2. Note: To raise the forest functional level, you must upgrade (or demote) all existing Windows 2000 domain controllers in your forest.
    If you cannot raise the forest functional level, you can click Save As in the Raise Forest Functional Level dialog box to save a log file that specifies which domain controllers in the forest still must be upgraded from Windows NT 4.0 or Windows 2000.
    If you receive a message that indicates you cannot raise the forest functional level, use the report generated by "Save As" to identify all domains and domain controllers that do not meet the requirements for the requested increase.
    The current forest functional level appears under Current forest functional level in the Raise Forest Functional Level dialog box. After the forest level is successfully increased and replicated to the PDCs in the domains, the PDCs for each domain automatically increase their domain level to the current forest level. The level increase is performed on the Schema FSMO and requires Enterprise Administrator credentials.

    Links

    How to raise domain and forest functional levels in Windows Server 2003 - 322692
     

Keyboard Shortcuts for VMware Workstation

VMware has a set of shortcut keys or hotkeys for quick control over your virtual machine. This is a list of them.

Ctrl+B Power on the Virtual Machine
Ctrl+D Edit the Virtual Machine Settings
Ctrl+E Power off the Virtual Machine
Ctrl+G Grab keyboard input focus
Ctrl+N Create a new Virtual Machine
Ctrl+O Open a Virtual Machine
Ctrl+P Edit User Preferences
Ctrl+R Reset Virtual Machine
Ctrl+Z Suspend the Virtual Machine
Ctrl+F4 Close the Virtual Machine
Ctrl+Alt Ungrab Input focus
Ctrl+Alt+Enter      Switch to Full Screen Mode
Ctrl+Tab Switch between ungrabbed virtual machines
Ctrl+Alt+Tab Switch between virtual machines

Improve VMware VM Performance by Defragmenting Virtual Disks

Have you noticed your VMware virtual machines sees like they’re sluggish and slow to respond?  Here’s how you can quickly defragment your virtual disks to make them fast as they were originally.
Just like a hard drive on a normal computer, the virtual hard drive on a virtual machine can become defragmented over time.  In fact, if your virtual disk is setup to dynamically expand over time, then fragmentation can become a serious problem, especially if your hard drive is low on free space.  You may notice your virtual machines running slower or being less responsive, and VMware itself may even notify you that your virtual disk is too fragmented.

Here’s what you’ll need to do.  First, while your virtual machine is running, run the default disk defragmenter as normal inside the virtual machine.  This may take some time if you haven’t done it in a while, and may also slow your whole computer down while it’s running.
image
Once the virtual machine’s OS has finished defragmenting, shut down the virtual machine.  Then, open your VMware virtual disk properties.  To do this in VMware Workstation, double-click on the Hard Disk info on the virtual machine’s main page.
sshot-2010-10-07-1-15-12-08
Alternately, if you’re using VMware Player, right-click on the virtual machine’s name and select Virtual Machine Settings.
image
Then select the Hard Disk entry from the Hardware tab if it’s not already selected.  If your virtual machine has multiple virtual disks, you may wish to repeat these steps on each virtual disk.
image
Click the Utilities button
image
VMware will start defragmenting your virtual disk.  This may take a while depending on your virtual machine’s size and how often you defragment it.
image
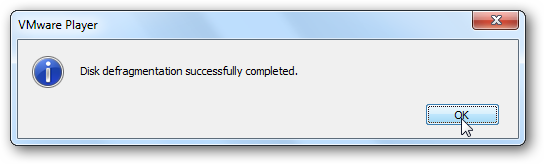
Once it’s done, you’ll be notified that the defragment is completed.
image
To improve performance even more, you should also regularly defragment your host computer’s hard drive.  This is not much of a problem in Windows 7 and Vista since they automatically keep your hard drive defragmented, but if you’re using XP, you might want to setup automatic disk defragmenting.  Alternately, if you’d like more defragmenting control, you can always run the defrag command in an elevated command prompt for a wide range of analysis and defrag options.
image
Most of us don’t think much about defragmenting virtual machines, but it can seriously improve your virtual machines’ performance.  We’re big fans of the free VMware Player, and if you have more advanced needs, VMware Workstation is a great option as well.  The great thing is, no matter which one you’re using, you can still keep your virtual machines running at top speed with a quick defrag. 

Make Virtual Machines Always Hide To The System Tray in VMware Workstation

My favorite feature in the latest version of VMware Workstation is that you can run virtual machines entirely in the background. This is most useful for “appliance” machines that you won’t actually use from the prompt, but through a web browser or ssh client. The only problem is that when you click the close button on the VMware window, you get a prompt saying “Some virtual machines are still powered on. You can continue to run these virtual machines in the background, suspend them for later use, or power them off now.“
I always want my virtual machines to run in the background!
image
You can disable that window by just telling VMware to always run virtual machines in the background by going to Edit \ Preferences.
image
Click the checkbox that says “Run powered on virtual machines in background after close”. Now when you click the close button, it will always just minimize the virtual machines to the system tray. Very useful!

Access VirtualBox Virtual Machines from the Windows 7 Start Menu or Taskbar

If you open different virtual machines in VirtualBox often, you will like VBoxLaunch. It allows you to launch virtual machines directly from the Start menu using a jumplist without having to launch the VirtualBox Manager first.

00_vboxlaunch_on_start_menu

VBoxLaunch does not change any settings in VirtualBox or the interface. It reads the list of virtual machines available in the VirtualBox Manager and creates direct links to those virtual machines in the jumplist for VBoxLaunch on the Start menu or the Taskbar.
Extract the .zip file you downloaded (see the download link at the end of the article) and copy the VBoxLaunch.exe file.
01_copying_vboxlaunch
Paste the VBoxLaunch.exe file in the VirtualBox program directory (usually C:\Program Files\Oracle\VirtualBox). Right-click on the VBoxLaunch.exe file and select Create shortcut from the popup menu.
02_create_shortcut
You may not have the correct permissions to create files in the VirtualBox program directory. If that is the case, Windows asks if you want to place the shortcut on the desktop instead. That is fine, so click Yes. It doesn’t matter where the shortcut is placed.
03_cant_create_shortcut_here
Right-click on the shortcut (wherever it was created) and select Pin to Start Menu.
NOTE: If you want to also access your virtual machines from the Taskbar, right-click the shortcut again and select Pin to Taskbar, as well.
04_pinning_to_start_menu
To create the jumplist containing links to your VirtualBox virtual machines, you must start VBoxLaunch once to open the VirtualBox Manager and then exit. Start VBoxLaunch from the Start menu or Taskbar.
05_starting_vboxlaunch
If the Open File – Security Warning dialog box displays, click Run to open the VirtualBox Manager.
06_security_warning_dialog
Select Exit from the File menu to close the VirtualBox Manager.
07_closing_virtualbox
Now, when you move your mouse over the VBoxLaunch Start menu item, a jumplist displays with all your available virtual machines listed. Simply select a virtual machine to open it without having to open the VirtualBox Manager first.
08_opening_vm_with_vboxlaunch
The jumplist is also available from the Taskbar if you pinned the VBoxLaunch shortcut there.
09_opening_vm_from_taskbar
The Manage virtual machines item under Tasks on the jumplist opens the VirtualBox Manager. This allows you to remove any shortcuts to the VirtualBox Manager you had. All you need is the VBoxLaunch shortcut pinned to the Start menu or Taskbar.
Download VBoxLaunch from http://nicbedford.co.uk/software/vboxlaunch/.
VBoxLaunch requires the Microsoft .NET Framework 3.5, which should already exist in Windows 7. If, for some reason, you do not have the Microsoft .NET Framework, you can download it from http://www.microsoft.com/download/en/details.aspx?id=22. We tested VBoxLaunch on Windows 7 Ultimate 64-bit, but the developer says it should also work on 32-bit systems.

Share Files and Printers between Windows 7 and XP

If you have a home network and are running Windows 7 and have XP on other PC(s) you might want to share files between them.  Today we will look at the steps to share files and hardware devices like a printer.
Sharing Files In Windows 7 and XP
Sharing folders between two Windows 7 machines with the new HomeGroup feature is an easy process, but the HomeGroup feature is not compatible with Vista or XP.  For this tutorial we are using Windows 7 x64 RC1 and XP Professional SP3 connected through a basic Linksys home wireless router. 
First make sure both machines are members of the same Workgroup which by default is named Workgroup.
workgroup 
On the Windows 7 machine go into Control Panel \ All Control Panel Items \ Network and Sharing Center then click on Change advanced sharing settings.
network and sharing
advanced
You will want to verify the following settings under Advanced Sharing Settings for the Home or Work and Public profile.
home or work settings
If you want any user to have access the public shares turn off password protection.  This is located in Advanced Sharing Settings toward the bottom of the list. 
 turn off pw
If you want to keep it enabled make sure there is a log in account for the other XP machines and they have a password.
create pw
Now if you go into Network in Windows 7 you should see your XP machine and the Windows 7 as well which in this case is Mysticgeek-PC.
Explorer
To share the printer on the Windows 7 machine go into Devices and Printers from the Start menu and double click on the printer icon.
devices
Next double click on “Customize your printer”.
1 Printer
In the Properties screen click on the Sharing Tab and check the box to share the printer and type in its share name.
2 printer share
If your XP machine is an x86 OS you can install Additional Drivers before setting up the XP machine.
3 Printer add drivers 
To find the shared folders and devices double click on the Windows 7 machine icon under Network.  Here you can see the printer connected to my Windows 7 machine is shared and also the Users Folder.
shared device and users
Continue into the Users folder and Public to see the shared folders, here I also created a folder called XP Share just to keep everything in central location.
xpshare
Over on your XP machine open up My Network Places to find the Windows 7 (mysticgeek-pc) shared folder.
My Network Places
Double click on the Share folder to find a list of shared folders in the Public folder on Windows 7.  If you have password protection enabled you will need to type in the username and password of the user account on the Windows 7 machine first. 
folders
Setup XP With Shared Printer
To set up the shared printer in XP you will need to go into Printers and Faxes from the Start menu and kick off the Add Printer Wizard.
add Printer
Now select “A network printer, or a printer attached to another computer” then hit Next.
network option
Next select “Connect to this printer…” and type in the path for the printer connected to the Windows 7 machine and click next.  
print
Now click Yes to the confirmation message.
confirm msg
Then click Finish the printer to install and complete the Wizard.
Complete
In some cases you will need to install the x86 XP drivers for the shared printer because the Windows 7 drivers are not compatible with XP.  When everything is installed open up Printers and Faxes to find the shared printer.
in explorer
This should help you get started with sharing your files and other devices with your Windows 7 machine.  When I first started I was able to see the printer on XP right away because I had a HomeGroup set up, but once I deleted it I needed to share the printer like you would for a workgroup.  You might also have to do a couple restarts of the XP machine for it to see the shared resources on Windows 7.  If you have had any experiences with sharing between Windows 7 and XP leave us a comment!

Using System Restore in XP

Windows is well-known for having driver and .dll conflicts, as well as all sorts of software that causes problems with your computer. Luckily there’s a System restore feature that can return your computer back to a known working configuration, as long as you’ve created a restore point.
Note that some software installations will create restore points automatically, but you should run it manually before installing any questionable applications. (Or better yet, don’t install questionable applications!)

Creating a Restore Point Manually
To create a Restore Point click on Start \ programs\ Accessories \ System Tools \ System Restore, and you’ll be given a wizard screen.
image
Click on “Create a restore point” and then click the Next button. You’ll be brought to a screen where you can type in a description for your restore point. Use something memorable if possible.
image
Once your restore point is created (which might take a while), you will get a confirmation screen.
image
All done creating the restore point!

Restoring from a Restore Point
To restore from a previously created restore point, open System Restore the same as above, but this time we’ll select “Restore my computer to an earlier time”. Note that System Restore is going to reboot your computer in order to restore.
image
Click the next button, and you’ll be shown a calendar with bolded dates wherever there is a restore point. Click on the date, and then click a restore point in the right hand side.
image
You’ll get a confirmation screen asking if you really want to do this. We’ll assume that there’s a problem requiring you to restore, so go ahead.
image
Your system will reboot and then restore your computer back to the previous configuration
Browser Name:
Browser Version:
Browser Code Name:
User-Agent: